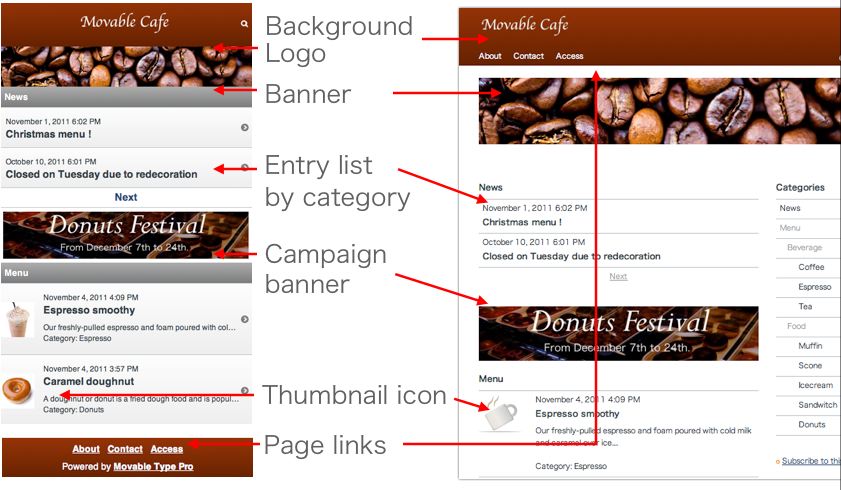
Smartphone theme
This page explains how to customize the smart blog theme. If you have not finished the installation, please read this guide (README) for the installation and troubleshooting.
Index
- Upload your banner image
- Change the header and footer background color
- Upload your logo image
- Upload your thumbnail icon
- Upload your touch icon
- Filter the entry list by categories
- Add links in the navigation menu
- Display campaign banners
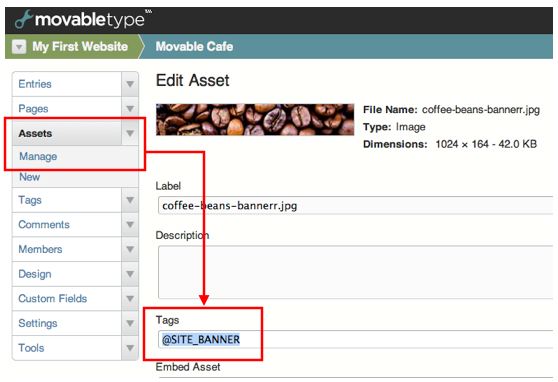
Upload your banner image
You can upload your own image to replace the banner image on the top page.
- The banner image should have a width greater than 1024 pixel.
- Click [Assets] > [New] from the side menu, and upload the banner image.
- Click the uploaded image from the list. The Edit Asset panel opens.
- Add "@SITE_BANNER" tag in the Tags field. If you add this private tag to the other images, the last uploaded image will be used.
- Rebuild your blog.
- The banner image appears both in PC and mobile.
The uploaded image is used in the Main Index template with the following snippet of code.
<mt:Assets tag="@SITE_BANNER" limit="1">
   <div class="banner">
     <div class="banner-inner inner">
       <img src="<$mt:AssetThumbnailURL width="1024"$>">
     </div>
   </div>
</mt:Assets>
When the Main Index template is browsed from mobile devices, the image will be automatically fitted into the browser's width with the following styling.
.banner img {
 display: block;
 max-width: 100%;x
 height: auto;
}
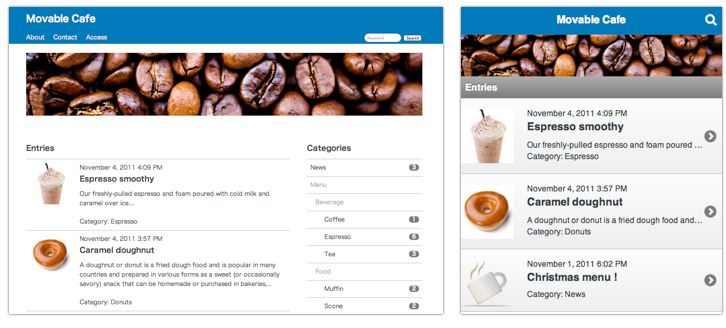
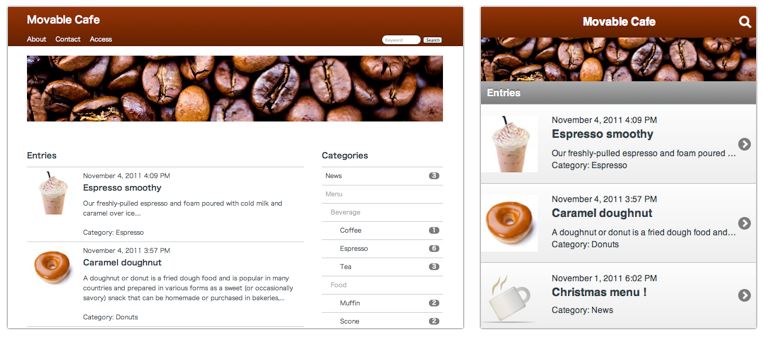
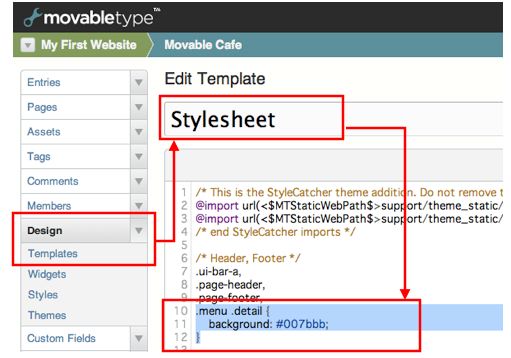
Change the header and footer background color
You can change the background color of header and footer by editing Stylesheet template. Click [Design] > [Templates] from the side menu, and click Stylesheet template from the list. Edit Template panel opens. This Stylesheet is shared between PC and mobile so that the change will be applied to both.
The header and footer HTML block have their own classes. You can change the color by targeting the following CSS description.
.menu .detail {
    background: #007bbb;
}
The following sample CSS changes the background color to brown, and also adds some gradation effects by using vendor prefixes for Webkit(Safari, Chrome) and Firefox.
.menu .detail {
    background: #963408;
    background: -moz-linear-gradient(top, #963408, #772200);
    background: -webkit-gradient(linear, left top, left bottom, from(#963408), to(#662200));
}
Save the edited Stylesheet and rebuild to apply the change.
Upload your logo image
Let's use your own logo image instead of the default text title.
- Click [Assets] > [New] from the side menu, and upload the logo image.
- Click the uploaded image from the list. The Edit Asset panel opens.
- Add "@SITE_LOGO" tag in the Tags field. If you add this private tag to the other images, the last uploaded image will be used.
- Rebuild your blog.
- The logo appears both in PC and mobile.
The uploaded image is used in the Banner Header template module with the following snippet of code.
<h1 class="title page-title">
  <a href="<$mt:BlogURL$>">
<mt:Assets tag="@SITE_LOGO" limit="1">
      <img alt="<$mt:BlogName encode_html="1"$>" src="<$mt:AssetThumbnailURL$>" class="page-logo">
<mt:Else>
  <$mt:BlogName$>
</mt:Assets>
  </a>
</h1>
Upload your default thumbnail icon
When an entry doesn't contain any image, the entry list shows the default thumbnail icon. You can change this default icon by uploading your image.
- The thumbnail image should be 80 pixel both in width and height.
- Click [Assets] > [New] from the side menu, and upload the thumbnail image.
- Click the uploaded image from the list. The Edit Asset panel opens.
- Add "@SITE_NO_IMAGE_ICON" tag in the Tags field. If you add this private tag to the other images, the last uploaded image will be used.
- Rebuild your blog.
- The default thumbnail is replaced by your image.
The uploaded image is used in the Entry Summary template module with the following snippet of code.
<mt:EntryAssets type="image" tag="@SITE_ENTRY_ICON" limit="1">
    <img src="<$mt:AssetThumbnailURL height="100" square="1"$>" class="thumb ui-li-thumb">
<mt:Else>
    <mt:EntryAssets type="image" limit="1">
    <img src="<$mt:AssetThumbnailURL height="100" square="1"$>" class="thumb ui-li-thumb">
    <mt:Else>
        <mt:Assets type="image" tag="@SITE_NO_IMAGE_ICON" limit="1">
    <img src="<$mt:AssetThumbnailURL height="100" square="1"$>" alt="NO Image" class="thumb ul-li-thumb">
        <mt:Else>
    <img src="<$MTStaticWebPath$>support/theme_static/smart_blog/images/no-image.png" alt="No Image" class="thumb ui-li-thumb">
        </mt:Assets>
    </mt:EntryAssets>
</mt:EntryAssets>
Upload your touch icon
Android and iOS allow users to create a bookmark on their home screens. You can customize the bookmark icon by uploading your image to the blog.
- The icon image should have a width and height greater than 114 pixel.
- Click [Assets] > [New] from the side menu, and upload the thumbnail image.
- Click the uploaded image from the list. The Edit Asset panel opens.
- Add "@SITE_TOUCH_ICON" tag in the Tags field. If you add this private tag to the other images, the last uploaded image will be used.
- Rebuild your blog.
- Bookmark your blog with iOS or Android browser.
- You will see the touch icon on the home screen.
The uploaded image is used in the HTML Head Mobile template module with the following snippet of code.
<mt:Assets type="image" tag="@SITE_TOUCH_ICON" limit="1">
  <link rel="apple-touch-icon-precomposed" href="<$mt:AssetThumbnailURL width="114" square="1"$>">
<mt:Else>
  <link rel="apple-touch-icon-precomposed" href="<$MTStaticWebPath$>support/theme_static/smart_blog/images/touch-icon-default.png">
</mt:Assets>
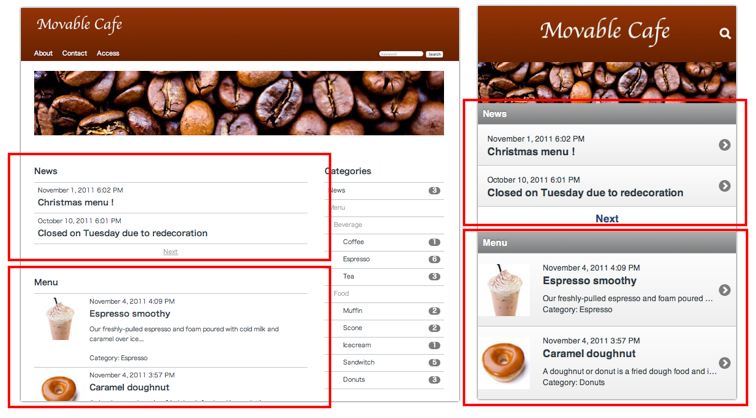
Filter the entry list by categories
There is a list of recent entries on the blog top page. You can filter this list by category. The following examples explain how to customize the list.
Click [Design] > [Templates] from the side menu. Click Main Index to open the Edit Template panel. In the Main Index template, there is mt:Include tag that includes Entry Listing template module.
<$mt:Include module="Entry Listing"$>
To filter the list by category, use the other template module named "Entry Listing - Category". This template module has the following attributes.
- entry_category="CATEGORY"
Specify the category name to filter entries. - entry_count="3"
Specify the number of entries displayed in the list. - list_type="simple"
If "simple" is specified, the list will be simple text list without entry icons.
For example, the following code displays two lists of entries. The first list shows two recent entries from the News category, and the second list shows three recent entries from the Menu category.
<$mt:Include module="Entry Listing - Category" entry_category="News" entry_count="2" list_type="simple"$>
<$mt:Include module="Entry Listing - Category" entry_category="Menu" entry_count="3"$>
Save and rebuild Main Index template to apply this change.
To include sub-categories, you need to edit "Entry Listing - Category" template module. Open the template and add include_subcategories="1" attribute to mt:Entries tag.
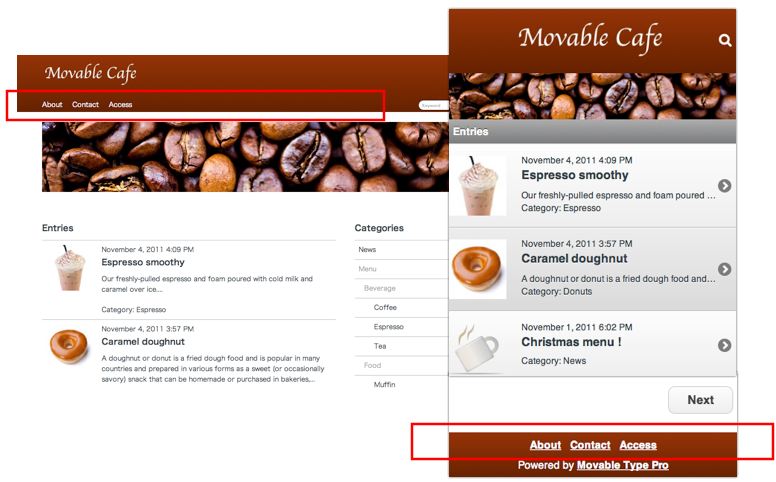
Add links in the navigation menu
You can add links to the individual pages such as "About" and "Contact" to the header and footer.
- Click [Pages] > [New] from the side menu, and create a new page.
- Add "@SITE_NAV_PAGE" tag in the Tags field.
- Save and publish the page.
- You will see the link in the header (with PC view) and footer (with mobile view).
This link snippet is in the "Menu - Pages" template module with the following code.
<mt:Pages tag="@SITE_NAV_PAGE">
  <mt:If name="__first__">
    <nav class="page-listing">
      <ul class="nav-list">
</mt:If>
        <li class="nav-item">
            <a href="<$mt:PagePermalink$>"><$mt:PageTitle$></a>
        </li>
<mt:If name="__last__">
    </ul>
    </nav>
  </mt:If>
</mt:Pages>
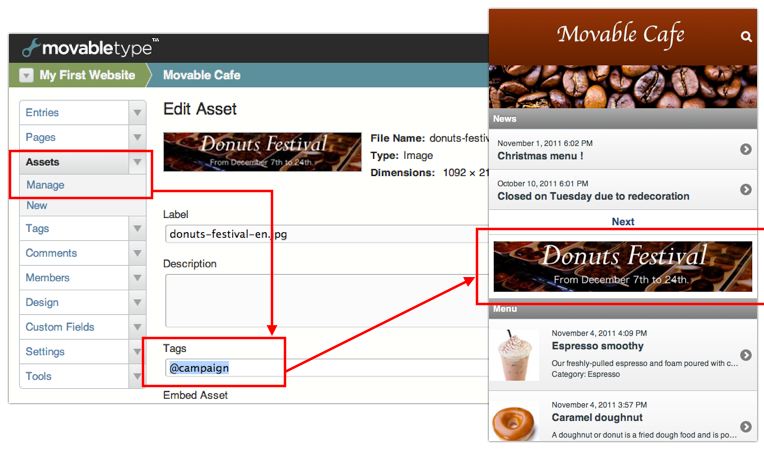
Display campaign banners
You can add a custom banner image to your blog top.
First, click [Design] > [Templates] from the side menu and open Main Index template to edit. Paste the following snippet of code where you wish to display your banner image.
<$mt:Include module="Page Banner" page_banner_tag="@campaign"$>
Specify page_banner_tag attribute which you will use as the private tag for the banner image and the linked page.
- The banner image should have a width greater than 640 pixel.
- Click [Assets] > [New] from the side menu, and upload the image.
- Click the uploaded image from the list. The Edit Asset panel opens.
- Add "@campaign" tag (or any other tag which you specified with the page_banner_tag attribute ) in the the asset's Tags field. If you add this private tag to the other images, the last uploaded image will be used.
- Click [Pages] > [New] from the side menu, and create a new page.
- Add "@campaign" tag (or any other tag which you specified with the page_banner_tag attribute ) in the page's Tags field.
- Save and publish the page.
- You will see the banner image on the blog top which links to the published page.
Templates and modules in the smart blog theme
The Smart Blog theme has following templates and modules.

Most of templates are common between PC and mobile. Only the following template modules are different. Each template such as Main Index includes either of the modules depends on the browser's UserAgent.
| Modules for PC | Modules for mobile |
|---|---|
| Header Menu | Header Menu Mobile |
| HTML Head | HTML Head Mobile |
| Footer JavaScript | Footer JavaScript Mobile |
| Related Content (widget) | none |
Switching template modules by DynamicMTML addon
This theme relies on DynamicMTML addon to switch template modules. DynamicMTML addon detects the browser's UserAgent and provides conditional tags to modify contents depends on the devices. Please see the DynamicMTML documentation for the detail.
The Smart Blog theme uses three conditional tags provided by this addon.
- mt:IfUserAgent (Conditional tag)
Specify wants or like attribute to detect the UserAgent. - MTML (Functional tag)
Output mtml tag in the static publishing template. Specify tag and params attributes. - mt:DynamicMTML (Block tag)
The code inside this block tag will not be processed in the static publishing, instead it will be processed in the dynamic publishing afterward. - mt:BuildRecurs (Block tag)
Use this block tag to wrap MTML or mt:DynamicMTML tags if it is processed by CGI such as the search or comment preview.
Switching modules in the system templates
System templates such as Comment Preview, Comment Response and Search Results are only processed by Movable Type CGI. Hence you can simply use mt:IfUserAgent tag as following.
<mt:IfUserAgent wants="SmartPhone">
    <mt:Ignore><!-- Include mobile module --></mt:Ignore>
    <$mt:Include module="HTML Head Mobile"$>
<mt:Else>
    <mt:Ignore><!-- Include PC module --></mt:Ignore>
    <$mt:Include module="HTML Head"$>
</mt:IfUserAgent>
Switching modules in the static publishing templates
For example, Page and Entry archive templates are processed by Movable Type first in the static publishing engine. For this step, use MTML tag to output mt:IfUserAgent conditional tag. Secondly when user actually browses this published page, the mt:IfUserAgent tag is processed dynamically by the DynamicMTML. Here is the example.
<mtml tag="mt:IfUserAgent" params='wants="SmartPhone"'>
    <mt:DynamicMTML>
        <$mt:Include module="HTML Head Mobile"$>
    </mt:DynamicMTML>
<mtml tag="mt:else">
    <$mt:Include module="HTML Head"$>
<mtml tag="/mt:IfUserAgent">
If there is a block which should be processed only in the dynamic publishing, you need to wrap it with mt:DynamicMTML tag.
Switching modules in the templates which are processed both in static and CGI
Templates such as Main Index and Category Entry Listing are published statically but also processed by CGI for pagination. In this case, MTML tag has to be wrapped by mt:BuildRecurs tag to work correctly with CGI.
<mt:BuildRecurs>
    <mtml tag="mt:IfUserAgent" params='wants="SmartPhone"'>
        <$mt:Include module="HTML Head Mobile"$>
    <mtml tag="mt:else">
        <$mt:Include module="HTML Head"$>
    <mtml tag="/mt:IfUserAgent">
</mt:BuildRecurs>