Stubbing Out Your Listing Screen
So let’s taking building a listing screen one step at a time. First let’s orient ourselves to the basic structure to a table listing template, and then we will explore each component in detail. Finally we will discuss the mode handler to populate the template with the data it needs to display a tabular listing of data.
Step 1: Register the Mode
As with any screen you want to add to Movable Type, the first step is always to register a new mode in your config.yaml file, for example:
name: Demo Plugin
id: DemoPlugin
applications:
    cms:
        methods:
            listing: $DemoPlugin::DemoPlugin::Plugin::listing
Step 2: Create Your Listing Template
Before we dive right in and show you a listing screen template in its entirety, let’s familiarize ourselves with the basis structure of the template by removing a lot of the nitty-gritty and technical details. The following sample template is therefore a non-functional and useless example, but it will highlight the major components of a listing screen template.
 1 <mt:setvar name="page_title" value="My Listing">
 2 <mt:setvarblock name="html_head" append="1"></mt:setvarblock>
 3 <mt:setvarblock name="system_msg"></mt:setvarblock>
 4 <mt:setvarblock name="related_content"></mt:setvarblock>
 5 <mt:setvarblock name="action_buttons"></mt:setvarblock>
 6 <mt:setvarblock name="html_body_footer">
 7    <mt:include name="include/display_options.tmpl">
 8 </mt:setvarblock>
 9 <mt:include name="include/header.tmpl">
10
11 <div class="listing-filter">
12   <div class="listing-filter-inner inner pkg"></div>
13 </div>
14
15 <mtapp:listing type="entry"
16     default="No events could be found."
17     empty_message="No events could be found.">
18   <mt:ignore>To be filled in later.</mt:ignore>
19 </mtapp:listing>
20
21 <mt:include name="include/footer.tmpl">
Now, let’s walk through the code above so that you can understand the major components of your listing template.
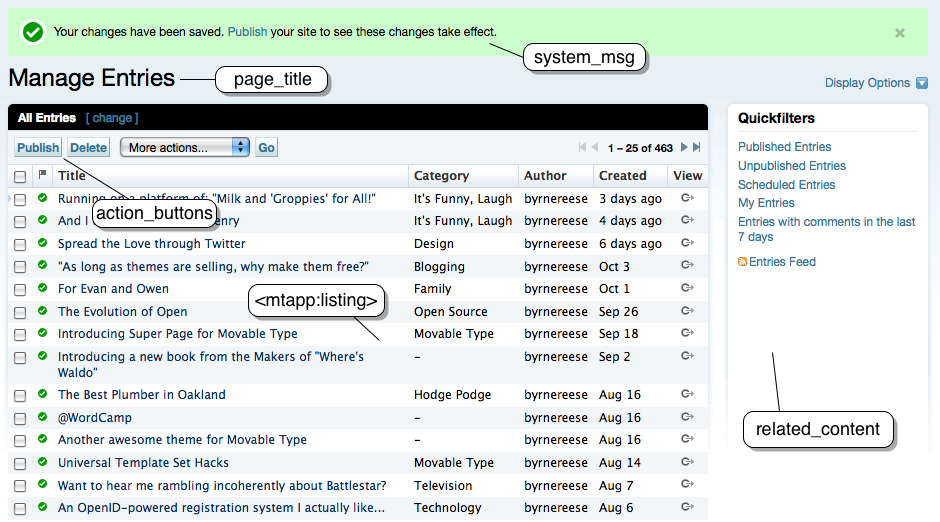
On line 1 we have page_title which displays the title of the page, which appear both as the window title, and as the title heading for the table generated by include/header.tmpl.
Line 2 contains a reference to html_head, which is a variable which gets output within the html > head of the listing screen. This variable allows you to insert your own custom javascript and/or CSS into the page.
Line 3 is system_msg which should contain all of the various status messages that can be displayed to the user from this screen. These status messages are conditionally displayed when a specific condition exists, or when the user has just completed an action.
The related_content variable on line 4, is an optional section found in the side bar of the listing screen. it can contain arbitrary HTML.
The table header contains several components: the list actions pull down menu, the action buttons, and the listing filter. The listing-filter on lines 11-13 can contain any arbitrary HTML, but is typically used within Movable Type to allow users to construct a custom filter for the listing table at hand. On line 5 is where you can find the block called action_buttons that is used to define the buttons that surface with the table itself.
The section defined as html_body_footer is rendered at the very bottom of the screen. This section is used to build out HTML elements and structures that are not shown by default. For example, the “Display Options” fly out dialog is defined in this section, just is only shown when the user clicks the “Display Options” button. This section is not limited to that use case however. It can also be used to display any HTML you want, or to render javascript to the page if you wish.
Finally, there is <mtapp:listing>, a special template tag that automates the generation of much of the HTML associated with the listing table itself, including the pagination controls and basic chrome.