Movable Type Developer Guide
Movable Type Developer Guide
Welcome to the Movable Type Developer Guide. This guide will provide those wishing to extend Movable Type’s core platform with custom functionality, user interfaces and other components. This is guide is appropriate for developers of all skill levels, but does require a least a passing knowledge of Perl. You will find that a lot can be accomplished in Movable Type with very little, or at least a very intuitive use of the Perl programming language.
This guide is divided into several main sections, and depending upon your familiar with both Perl and Movable Type, you may want to start at the beginning or jump to another section. Those sections are:
Introduction to Plugins - answer the most basic question: “what is a plugin?” and learn about plugin packaging.
Plugin Basics: Building Your First Movable Type Plugin - implement a very simple plugin with and handful of features, learn about the Movable Type registry, and learn some good coding practices.
Intermediate Plugin API Topics: Taking Your Plugin to the Next Level - learn about each of the features Movable Type exposes through the registry, including configuration directives, text filters, template tags, ping servers, and more.
Advanced Developer Topics - Obtain Movable Type Developer nirvana by mastering callbacks, objects, database interaction and performance optimization.
Using this Guide
Often this guide needs to refer to a path on the file system that is relative to Movable Type’s home directory. Movable Type’s home directory, also known or referred to by the phrase “MT_HOME” or “$MT_HOME,” is where Movable Type is installed. Because Movable Type can be installed in numerous locations depending upon personal preference, operating system conventions, this guide (as well as most examples online) utilizes the following conventions to refer to the path where you can find Movable Type’s files:
/path/to/mt
Example
Let’s assume for a moment that you have installed Movable Type into the following directory on your web server:
/var/www/vhosts/www.somedomain.com/cgi-bin/mt
If this is true, then you should find the following files on your filesystem:
/var/www/vhosts/www.somedomain.com/cgi-bin/mt/mt.cgi/var/www/vhosts/www.somedomain.com/cgi-bin/mt/mt-config.cgi/var/www/vhosts/www.somedomain.com/cgi-bin/mt/lib/MT.pm- And many more…
So using, that as the basis for this example, if this guide refers to the path:
/path/to/mt/lib/MT/App/CMS.pm
Then that path can be translated into the following path on your filesystem:
/var/www/vhosts/www.somedomain.com/cgi-bin/mt/lib/MT/App/CMS.pm
Also, this guide makes frequent reference to your Plugin.pm file. The Plugin.pm file refers to the main library file (located in /path/to/mt/lib/PluginName/) that contains all of the application logic and Perl code for your plugin. Technically this file can be named whatever you want provided that it is a valid Perl module. For the purposes of consistency and the integrity of the examples in this guide, we use and refer to this file as “Plugin.pm”.
Introduction to Plugins
Movable Type’s Plugin API provides developers with the ability to extend Movable Type’s core platform with additional functionality. Developers use this API to create “plugins,” which can be as simple as providing a template tag for designers to use in their templates, or as complex as providing an entire suite of capabilities. Plugins can also function as an entire stand alone application that runs on top of the Movable Type Publishing Platform.
The following sections will introduce developers unfamiliar to Movable Type and its conventions to the structure of a plugin, how it should be packaged and delivered to users, and finally how you can list it in the directory to help others find and install it.
- The Basic Structure of a Plugin
- Plugin Packaging
- The Plugin Directory
The Basic Structure of a Plugin
All Movable Type plugins are organized by a simple set of files and directories. These files and directories contain all of the static files, templates and application code needed for the plugin to operate.
A plugin can typically be described most commonly by the following four primary components:
- A
config.yamlor plugin configuration file. - A collection of Perl library files.
- A set of templates that govern the look and feel of pages within your plugin.
- A set of static images, javascript and css files used within your plugin templates, or by the published blog.
This translates into the following structure on your file system:
/path/to/mt/plugins/PluginName/config.yaml
/path/to/mt/plugins/PluginName/lib/*
/path/to/mt/plugins/PluginName/tmpl/*
/path/to/mt/mt-static/plugins/PluginName/*
Note: Technically there can be great variability in how authors organize their plugins as Movable Type does not actively enforce a rigid file structure or organization scheme. However, plugin developers are highly encouraged to follow the above organization to make it easier for users to install and administrators to maintain plugins on their system.
Other Common Directories
External or 3rd Party Library Files or Modules
If your plugin relies on 3rd party Perl modules or libraries then it is recommended that they be packaged in the following directory:
/path/to/mt/plugins/PluginName/extlib/*
Tip: When should I package 3rd party libraries with my plugin?
To make installation of your plugin easier upon your users, you may want to package any prerequisites directly within your plugin. However before you do that, make sure of the following:
The module’s license allows you do to so. If the 3rd party module uses the “Artistic” license (the same licenses as Perl itself) then you can safely include it. The same is true for modules that use the BSD and LGPL license provided that you do not modify the source code of the module.
The module does not require compilation. If the third party library contains
.xsfiles or.cfiles then your users must install the module independently.
PHP and Dynamic Publishing Files
PLugins that define template tags should also provide PHP versions of those tags so that they are compatible with blogs and templates configured for dynamic publishing. These files should be placed within the following directory within your plugin:
/path/to/mt/plugins/PluginName/php/*
Naming and Packaging Conventions
Use spaces in your plugin’s display name. Developers like symmetry, who doesn’t? But maintaining symmetry between the display name of your plugin and the file system is not ideal from a searchability and findability perspective.
- HelloWorld - bad
- Hello World - good
Do not prefix the name of your plugin with “MT” It is a foregone conclusion that your plugin works with Movable Type. If you wish to indicate this explicitly, append the phrase “for Movable Type” to your plugin’s display name, or use it as your plugin’s tag line. Examples:
- MTHelloWorld - bad
- HelloWorld - bad
- Hello World - good
- Hello World for MT - ok, but spelling out Movable Type is better
- Hello World for Movable Type - good
- Hello World, a plugin for Movable Type - good
Use mixed case directory names. The use of all lowercase letters in the structure of your plugin is generally not recommended. What is recommended is t capitalize the first letter of the plugin, and the first letter of each distinct word.
plugins/helloworld/- badplugins/helloWorld/- badplugins/MTHelloWorld/- bad (see note above: the use of the “MT” prefix is not recommended)plugins/HelloWorld/- good
Include a README file. A
PLUGIN_NAME-README.txtfile should be placed in the root of your plugin’s archive that provides adequate documentation on the installation and usage of your plugin.Include a LICENSE file. A
PLUGIN_NAME-LICENSE.txtfile should be placed in the root of your plugin’s archive that contains the text or a reference to the license associated with your plugin.
Plugin Packaging: Makefile.PL and Plugin Manifests
Once your plugin is ready for distribution, you will need to package it up into a single file, a zip file or a “tarball” (a .tar.gz file common among unix users) so that your users can easily download it.
Even though you have a choice between .tar.gz and .zip files we recommend only producing .zip files as in this day and age, zip is supported almost everywhere.
To create a zip file, you first need to produce two simple files: a Makefile.PL file and a MANIFEST.SKIP file. These files produce an automated way for you to reliably create a zip file. Here are some examples:
Example Makefile.PL
use ExtUtils::MakeMaker;
WriteMakefile(
    NAME            => "My Plugin's Display Name",
    VERSION         => '1.1',
    DISTNAME        => 'MyPlugin',
);
Example MANIFEST.SKIP
# version control
\bCVS
(^|/)\.

# CPAN chain files
^MANIFEST
^Makefile
^META.yml$
^blib/
~$

# packages
\.zip$
\.tar\.gz$
Creating a zip file for your plugin
Provided you have created a Makefile.PL and MANIFEST.SKIP file, the following sequence of commands will quickly and easily produce a zip file of your plugin. The zip produces will be clean - there will be no .~ files, or .svn files, or any other artifacts of development. The zip file will automatically have the version number of the plugin embedded within it to make it easy for your users to differentiate between older and newer builds.
> cd src/PluginName
> perl Makefile.PL
> make manifest
> make zipdist
Storing Your Plugin in Source Control
To make it easier for other Movable Type developers to collaborate on plugins you author, but also to make packaging and maintenance easier for yourself, the following conventions have been adopted by the community at large in regards to how you should store and manage your plugins in subversion, a popular and free source code control system.
/path/to/src/mt-plugins/trunk/PluginName/config.yaml
/path/to/src/mt-plugins/trunk/PluginName/PluginName-README.txt
/path/to/src/mt-plugins/trunk/PluginName/Makefile.PL
/path/to/src/mt-plugins/trunk/PluginName/MANIFEST.SKIP
/path/to/src/mt-plugins/trunk/PluginName/plugins/PluginName/lib/*
/path/to/src/mt-plugins/trunk/PluginName/plugins/PluginName/tmpl/*
/path/to/src/mt-plugins/trunk/PluginName/mt-static/plugins/PluginName/lib/*
The pattern, if not immediately evident, is to mirror the file structure of Movable Type itself. That way users wishing to install your plugin can follow these simple instructions and trust that all of your plugin’s files will wind up in the right place:
> cp PluginName-1.0.zip /tmp/
> cd /tmp/
> unzip PluginName-1.0.zip
> cp -a PluginName-1.0/* $MT_HOME
And sometimes the follow if you have placed your mt-static files in a directory other than $MT_HOME/mt-static/:
> cp -a PluginName-1.0/mt-static/* /path/to/mt-static/
The Plugin Directory
Finally, the official Movable Type plugin directory is where you will go to advertise the existence of your plugin and where everyone in the Movable Type world will go to find it. It is the single most comprehensive listing of Movable Type plugins anywhere and commands a significant audience.
Welcome to the Plugin Directory

Creating an Account in the Plugin Directory
In the upper right hand corner of the Plugin Directory, click the “Register” link.

Registering Your Plugin
Once you have logged in and/or created an account click on the “Submit Plugin” link from the front door of the directory. You will then be prompted to fill out a form describing your plugin.

When you are complete, hit Save and your plugin will be submitted to the community for review. In a couple of days your plugin should be approved.
Plugin Basics: Building Your First Movable Type Plugin
From the following sections you should now have a pretty good understanding of what a Movable Type plugin is. We have not yet discussed the many different types of plugins one can possibly create, but suffice it to say you can build virtually anything. Let’s not worry about that complexity right now. Instead, let’s begin by wading into the shallow end of the pool. Then as we progress through this guide we build your skills and confidence up so that you will feel comfortable at the deeper end of the pool.
One of things we hope you will see is just how easy it can be to write a plugin. Movable Type has been designed and continues to evolve in such a way that it tries to limit the amount of programming knowledge you need in order to develop a plugin. The use of Perl is sometimes unavoidable, but as we understand more about the patterns developers follow to build their plugins, the Movable Type community will adapt to making those patterns easier to replicate.
The following section with introduce you to how Movable Type plugins work. First we will discuss the basic syntax of the heart of any Movable Type plugin: the configuration file, or config.yaml file. Then we will create the simplest plugin you could possibly write and slowly add to it, introducing you to simple concepts as we go.
- Introduction to the Movable Type Registry
- A YAML Primer
- Registering Your Plugin: Basic Plugin Metadata
- Adding Your First Configuration Directives
- Adding a Simple Template Tag
- Adding a Conditional Template Tag
- Adding a Template Tag Modifier
The Movable Type Registry: What it is, and how it works.
The heart of any Movable Type plugin and in Movable Type itself is the Movable Type Registry. Perhaps “heart” is not an apt metaphor. A more accurate comparison might be to the “backbone.” That is because the registry provides the rough outline or skeleton of a plugin by declaring all the template tags, configuration directives, objects, callbacks, and all of its other features as well. From that skeleton we attach the muscles that make things move using Perl.
This skeleton is a expressed in a very simple syntax known as YAML (see the YAML Primer later on in this section) and is found in a single file in your plugin named config.yaml. Within the config.yaml file developers express the basic capabilities their plugin exposes in outline form. Let’s look at a simple example:
Example config.yaml File
name: Fluid App
id: FluidApp
author_link: http://www.majordojo.com/
author_name: Byrne Reese
description: This plugin provides enhanced support for Fluid for Mac OS X.
version: 0.90
plugin_link: http://www.majordojo.com/projects/mt-fluid-app.php

applications:
    cms:
        methods:
            fluid_update: $FluidApp::FluidApp::Plugin::cms_update
callbacks:
    MT::App::CMS::template_source.header: $FluidApp::FluidApp::Plugin::xfrm_hdr
Don’t worry if the above example does not make any sense yet, it is provided simply to introduce you to the syntax or structure of a config.yaml file. This example actually comes from a real Movable Type plugin - one that provides an integration with the Fluid Application for Mac OS X.
It may not be evident to a non-technical person, but the config.yaml file above does not define behavior, it simply declares the types of behavior this plugin will exhibit and then points to methods within the plugin’s source code where that behavior is defined.
A Cumulative Registry
An important fact in working with your plugin’s config.yaml is that you can add as many elements discussed in this guide into a single config.yaml file. In theory you could merge all of the examples discussed in this guide and produce a single uber-example.
So, let’s get you up to speed on YAML.
A YAML Primer: Yet Another Markup Language
The Movable Type registry is expressed using a simple syntax known as YAML. Before we introduce you to YAML and give you enough of a grasp of its fundamentals to use this manual, please understand that there are many more useful and more detailed guides to YAML online if you wish to further your understanding and appreciation this alternative markup language.
About YAML
YAML was developed by engineers who need to create simple hierarchical documents, but were tired of the verbosity of XML. In fact, YAML does virtually all that XML, in its basic form, was designed to do, but does it in a way that is easier to read and faster to type. Therefore, if you have a basic understanding of XML, you will come up to speed on YAML in no time. Take a look at these two examples, one in XML and the other YAML:
XML
<?xml version="1.0">
<address>
    <first_name>Byrne</first_name>
    <last_name>Reese</last_name>
    <email>byrne@majordojo.com</email>
    <company>
        <name>Six Apart, Ltd.</name>
        <street_address>
          548 4th Street, San Francisco, CA 94107
        </street_address>
    </company>
</address>
YAML
address:
    first_name: Byrne
    last_name: Reese
    email: byrne@majordojo.com
    company:
        name: Six Apart, Ltd.
        street_address: 548 4th Street, San Francisco, CA 94107
Aaahhh, its like a breath of fresh air.
Ok, that is not entirely fair, as XML is a very powerful markup language capable of expressing extraordinarily complex data types. However, for simple structures, YAML is much simpler — which makes it the perfect syntax for Movable Type’s registry.
Author’s Note: Technically, the designers of YAML made it possible to do everything you can do in XML in YAML. However, Movable Type’s YAML parser does not support the full YAML specification - just the minimal subset to keep this simple and fast.
Basic YAML Data Structures
Here are some different ways to represent common data structures in YAML:
Arrays
i_am_an_array:
    - value1
    - value2
    - value3
Hashes
i_am_a_hash:
    key1: value1
    key2: value2
    key3: value3
Registering Your Plugin: Basic Plugin Metadata
You now know what a plugin is, you know what the registry is and you know the basic syntax of YAML. It is time for you to write your first plugin. So, without further ado:
Create a directory called
/path/to/mt/plugins/HelloWorldIn that directory create a file called
config.yamland open it in a text editorAdd the following text to your
config.yamlfile:name: Good for Nothing Plugin for Movable Type id: Good4Nothing author_link: http://www.yourwebsite.com/ author_name: Your Name Here description: This plugin is an example plugin for Movable Type. version: 1.0To see your new plugin, login to Movable Type and navigate to: System Overview > Plugins. You should see “Good for Nothing Plugin for Movable Type” listed there.
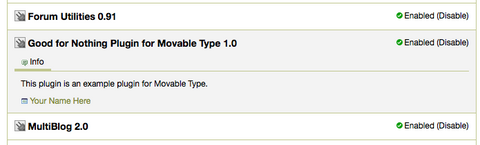
Congratulations, you just wrote your first Movable Type plugin, and you didn’t even have to write any code! Wow. Yeah, I knew you would be impressed.
So what does this plugin do?
Good question. It does absolutely nothing, just as the name implies. But let’s review what you just did.
The above config.yaml file told Movable Type the basics of what it needed to know about your plugin to list it properly among other plugins in your installation. Here is a brief overview of the registry keys used above, as well as some additional keys you might be interested in using:
- name - The display name of the plugin.
- id - A unique identifier for this plugin used when looking up this plugin’s data in the registry. It is also used when referring to handlers within the plugin (optional - when left unspecified, the plugin’s directory name will be used).
- key - The string used by Movable Type when storing and retrieving stored via
MT::PluginData(optional - when left unspecified, the plugin’s ID will be used). - author_link - The URL to the primary author.
- author_name - The name of author or authors.
- description - A brief one or two sentence of what this plugin actually does.
- version - The current version of the plugin.
- plugin_link - The URL to the plugin’s homepage.
- doc_link - The URL to the plugin’s documentation.
But who wants a plugin that does nothing? Time now to wade a little deeper into the pool.
Adding Your First Configuration Directives
Now that you have successfully registered your first plugin, let’s see if we can’t have it actually do something mildly useful.
We will begin by introducing you to a simple capability of plugins: the ability to define new configuration directives that can be placed within your system’s mt-config.cgi file.
Why Use Configuration Directives?
The behavior of most plugins is very dynamic in nature, meaning that their behavior changes depending upon their context, configuration, or a number of other different variables. One of the most common ways to change a plugin’s behavior is through a configuration directive.
Configuration directives reside in your Movable Type mt-config.cgi file and provide system administrators with a way of customizing your plugin’s behavior in a prescribed way without having to edit code.
In this first example we will define a configuration directive that will hold the URL to an image that we will want to later display on a web page. Here is a sample config.yaml that registers this directive:
name: Good for Nothing Plugin for Movable Type
id: Good4Nothing
author_link: http://www.yourwebsite.com/
author_name: Your Name Here
description: This plugin is an example plugin for Movable Type.
version: 1.0
config_settings:
MyImageURL:
default: http://www.movabletype.com/images/overview-1.jpg
Look at that: you just added to the capabilities of your plugin without writing any code. Again.
The example above also shows how you can register a default value for the directive, just in case an administrator had not explicitly set a value.
Yet again, however, this configuration directive is not that helpful on its own. What we need is a way to access this configuration directive and display its contents on a blog or web site. The following section will help with just this.
Adding a Simple Template Tag
Now that you have created your first Movable Type configuration directive, we need a way to display it’s assigned value on a blog or web site. Hopefully you will find accomplishing this just as simple as before, however, this time we will need to actually create some code.
A Word About Perl
Perl has a reputation for being impossible to read and overly complex. There is a kernel of truth to every stereotype I suppose, but the truth is that Perl need not be complex or scary to the average programmer. In fact, pretty code versus ugly code is more of a reflection of the programmer who wrote it, then it is of the language itself. But be that as it may, the following examples should show that virtually any person who is familiar with PHP or Javascript has the knowledge they need to write enough Perl code to be dangerous; and furthermore they can write readable Perl in the process.
As always, let’s start with the YAML you will need to define your first template tag:
name: Good for Nothing Plugin for Movable Type
id: Good4Nothing
author_link: http://www.yourwebsite.com/
author_name: Your Name Here
description: This plugin is an example plugin for Movable Type.
version: 1.0
config_settings:
    MyImageURL:
        default: http://www.movabletype.com/images/overview-1.jpg
tags:
function:
MyImageURL: $Good4Nothing::Good4Nothing::Plugin::tag
There are a couple of things going on here. First the ‘function’ key defines the type of tag we are creating (we will review the other types of tags later in this manual). A function template tag simply outputs text.
The child element of function is MyImageURL, which defines the name of your template tag. The value of MyImageURL is a reference to a subroutine defined elsewhere in your plugin. When you include this template tag on your web site, Movable Type will invoke the subroutine called “tag” located in the module “Good4Nothing::Plugin” defined by the plugin called “$Good4Nothing” (corresponding to the ‘key’ used when registering your plugin).
Finally, Movable Type will support multiple case-insensitive syntaxes in referencing the tag name you create. For example, all of the follow are valid ways to refer to the template tag defined above:
<mt:MyImageURL><mt:myimageurl><$MTMyImageURL$><$mt:myimageurl$><mtmyimageurl>
Ok, take a deep breath, it is time for some code.
Your Plugin Module
When we discussed “The Basic Structure of a Plugin” we talked about Perl library files that reside in your /path/to/mt/plugins/Good4Nothing/lib directory. These “library files” are the source code of your plugin.
Most simple plugins have only one library file which adheres to this basic naming and packaging convention:
/path/to/mt/plugins/MyPluginName/lib/MyPluginName/Plugin.pm
However, technically this is just convention. Plugins can and do deviate from this and so can yours.
Let’s begin:
Create a directory called:
/path/to/mt/plugins/Good4Nothing/lib/Good4Nothing
In that directory create a file called
Plugin.pmand open it in a text editorAdd the following text to your
Plugin.pmfile:# Good for Nothing Plugin for Movable Type # Author: Your Name Here, your.email@address.com # Copyright (C) 2008 Your Name Here # This file is licensed under the Artistic License, or the same # terms as Perl itself. package Good4Nothing::Plugin; use strict; sub tag { my ($ctx) = @_; my $cfg = $ctx->{config}; return $cfg->MyImageURL; } 1; # Every module must return true
The first 5 lines are boiler plate. Every Perl module and every source code file should include:
- a brief description of what the file does
- a copyright notice
- the name of the author
- the license under which the source code is made available.
For brevity’s sake, subsequent examples will omit this boiler plate code.
The next two lines define the name of the module, “Good4Nothing::Plugin” and signal to Perl to be more stringent in the syntax it will allow (‘use strict’). This is a good thing as it will allow Perl to help enforce in your code better coding practices by surfacing warnings you really should work to eliminate. As a general principle: no program, regardless of language, should issue warnings.
Building plugins to work with a specific version of Movable Type
When a plugin has been authored against a specific major version of Movable Type (e.g. MT 4.x, MT 5.x, MT 6.x etc), then it is recommended that your Plugin.pm file also include the line:
use MT 4;
This signals to Movable Type what version of the internal plugin API is being used allowing Movable Type to adapt more readily to any backwards compatibility issues that may exist between your plugin and the current version of Movable Type.
Template Tag Handler
The remainder of the Plugin.pm file above defines the meat of your plugin. Let’s look at it more closely:
sub tag {
    my ($ctx, $args) = @_;
    my $cfg = $ctx->{config};
    return $cfg->MyImageURL;
}
Movable Type passes into every tag handler the current Movable Type “context.” The context contains critical information about the system, including information about the current user, the current request, and the system’s configuration. We will use the context to retrieve the value of the MyImageURL configuration directive we declared earlier.
Now that the template tag has been defined you can now use the following tag in your templates to output the value associated with the MyImageURL configuration directive:
<mt:MyImageURL>
We are almost done. If we stop there, you will never succeed in your Jedi training. As Yoda famously said:
“For once you stop documenting your code, forever will you be doomed to forget its function. Relegate your users to confusion you will.”
I am pretty sure he said that. You can look it up.
Inline Documentation
Movable Type is a program written in the Perl programming language and utilizes the inline documentation conventions familiar to most Perl programmers: POD.
I will admit that POD is not the best documentation standard in the world, but its what we’ve got. Again, the philosophy of Movable Type is to keep things simple, despite despite the fact that POD can sometimes be a pain to look at, in Movable Type we utilize just the minimum to keep it easy to read and to write.
We strongly recommend that every template tag be documented using POD. To make documentation easier to maintain, we recommend that each template tag have its documentation included in close proximity to the tag handler that defines its functionality.
To round out our demonstration of writing your first template tag, we provide a complete example that includes documentation:
# Good for Nothing Plugin for Movable Type
# Author: Your Name Here, your.email@address.com
# Copyright (C) 2008 Your Name Here
# This file is licensed under the Artistic License, or the same
# terms as Perl itself.
package Good4Nothing::Plugin;
use strict;
use MT 4;

#############################################################
=head2 MyImageURL

This tag outputs the contents of the MyImageURL configuration
directive.

=cut
sub tag {
    my ($ctx,$args) = @_;
    my $cfg = $ctx->{config};
    return $cfg->MyImageURL;
}
1; # Every module must return true
Without going into too much detail the string of “#” characters is included to make it easier to visually demarcate the beginning of a new tag or function being documented. The =head2 is analogous to <h2> in HTML and signals the beginning of the documentation, and the =cut signals the end of the documentation. Everything else is just documentation.
Congratulations, you have waded all the way into the pool. Now that wasn’t so bad was it?
Summary and Conclusion
You have done well young Padawan. You now possess all of the fundamentals of Movable Type plugin development to create just about anything. Of course the complexity of your config.yaml and your source code will vary with the scope and ambition of your plugin, but the basic pattern has been established for creating any feature in Movable Type:
Layout the structure of your plugin.
Create a
config.yamlfor your plugin that defines its basic structure.Create a
Plugin.pmfile that contains the logic, or source code of your plugin.Document your code.
In subsequent sections of this guide we will discuss additional and more advanced techniques in extending and adding features to Movable Type.
Intermediate Plugin API Topics: Taking Your Plugin to the Next Level
With the basics behind us we can begin tackling problems and issues that you are much more likely to face in the real world. Not only are we going to revisit some of the topics previously discussed in order to cover them in much greater detail, but we are going to introduce entirely new concepts that range across the entire spectrum of Movable Type’s capabilities.
Each topic will follow a simple pattern in its example: a config.yaml excerpt and a code sample in Perl that is meant for your Plugin.pm file. With a more complete view of the capabilities of Movable Type’s registry we will then dive much deeper into Movable Type’s Perl API, exploring its many interfaces and capabilities.
First up though are in depth look at two things we already familiar with:
- configuration directives
- template tags
Configuration Directives: A Complete Reference
The first plugin you built in this guide helped you to create a plugin with a configuration directive. But we only scratched the surface.
A quick review: configuration directives are placed in your Movable Type’s mt-config.cgi file by a system administrator. Not everyone on an install has the access to the machine to make this kind of change, which limits the utility of configuration directives to some extent. We will explore more user friendly means of configuring Movable Type later, but for now, let’s round out our knowledge of this critical piece of Movable Type. (See also: Tip: When is it best to use a configuration file?)
Here is the config.yaml file we were basing previous examples on:
name: Example Plugin for Movable Type
id: Example
description: This plugin is an example plugin for Movable Type.
version: 1.0
config_settings:
    MyLogPath:
        default: /var/log/mt/errors.log
Let’s slowly add to this as we talk about additional concepts and features supported by the Movable Type config_settings registry.
Registering File Paths
An additional option labeled path can be used when registering a configuration directive. This option should be used whenever the configuration directive stores a reference to a path on the filesystem (not a url, but a path). This enables Movable Type to convert all relative paths referenced by the directive to an absolute path automatically.
config_settings:
    MyLogPath:
        default: /var/log/mt/errors.log
        path: 1
Handlers
Some configuration directives may have a default value, but a default value that may be dependent upon other variables in the system. Therefore a static default value may not suffice. For example, you may have a configuration directive that is dependent upon where you have Apache installed, and it will formulate a path based on that if a explicit value is not set by an administrator.
To achieve this, you need to use the handler option like so:
config_settings:
    MyLogPath:
        handler: $Example::Example::Plugin::MyLogPath
        path: 1
Then, in your Plugin.pm file you add the following subroutine (comments have been added to the code to help make sense of what is going on):
sub MyLogPath {
    my $mgr = shift; # A reference to MT::ConfigMgr

    # if this method is invoked with the intent to set the value,
    #    go ahead and set the value, then return.
    return $mgr->set_internal( 'MyLogPath', @_ ) if @_;

    # user is attempting to retrieve the value
    my $name = $mgr->get_internal('MyLogPath');

    # if a value has been explicitly set, return it
    return $name if defined $name;

    # Ok, guess what the value should be:
    if ($ENV{HTTPD_HOME}) {
        return $ENV{HTTPD_HOME} . '/logs';
    } else {
        return 'logs/';
    }
}
Configuration Directive Types
Movable Type supports a type registry property with configuration directives which controls how their values should be parsed and/or aggregated. There are three types:
- scalar (default)
- array
- hash
Here’s what it looks like in the registry:
config_settings:
    FavoriteWebSites:
        type: array
Scalars
The default value of the type property is scalar. This requires that the configuration directive possess only a single value. When two config directives are defined with the same name, then the last value specified take precedence. For example, if your mt-config.cgi contained the following:
CGIPath /cgi-bin/mt/
MyDirective foo
MyDirective bar
Then the following:
$mgr->get_internal('MyDirective')
Could only return the value “bar” because it was the last to occur in the config file.
Arrays
Config directives of type ‘array’ result in Movable Type aggregating all config directive values that have the same name into an array or list.
For example, if your mt-config.cgi contained the following:
CGIPath /cgi-bin/mt/
MyDirective foo
MyDirective bar
Then the following:
$mgr->get_internal('MyDirective')
Would return an array containing the values ‘foo’ and ‘bar.’
Hashes
Config directives of type ‘hash’ are expressed a little bit differently. Values are expressed in two parts: a hash key, and a hash value. For these types of directives Movable Type aggregates all config directives of the same name into an hash of key/value pairs.
For example, if your mt-config.cgi contained the following:
CGIPath /cgi-bin/mt/
MyDirective foo 123
MyDirective bar abc
Then the following:
$mgr->get_internal('MyDirective')
Would return a hash containing:
foo => 123
bar => abc
Aliases
Suppose you set a configuration directive in version 1.0 of your plugin, but then later had the realization that the name you chose for the directive was not ideal. In the next version of your plugin you want to change the name of the directive, but you don’t want to break backwards compatibility with users of version 1.0 when they upgrade.
To map one configuration directive to another, use the alias option like so:
name: Example Plugin for Movable Type
id: Example
description: This plugin is an example plugin for Movable Type.
version: 1.0
config_settings:
    MyLogPath:
        default: /var/log/mt/errors.log
        path: 1
    MyErrorLogPath:
        alias: MyLogPath
Accessing Configuration Properties in Perl
Finally, whenever you need to access the value entered by the system administrator for a configuration directive, you can do so using some very simple Perl code:
use MT;
sub some_method {
    my ($foo) = @_;
    my $log = MT->config('CustomErrorLog');
    # do stuff
}
Note: One thing of interest is the static reference to MT. MT is actually a singleton and as a result there is no need for a developer to instantiate an instance of MT each an every time they need to access its context.
Tip: When is it best to use a configuration file?
Given that there are multiple ways to collect configuration data, when is it best to use a configuration file instead of via a user interface? This is actually a very difficult question to answer definitively. Consider the following:
Will the configuration property need to be modified frequently? If so, you may consider implementing a UI for sheer convenience.
Will setting the configuration property need to be a highly privileged right on the system? If so, then by placing it is a config file you ensure that only users with direct access to the file system will have permission to edit it.
How quickly do I need to introduce a new feature I am planning that requires configuration? If the answer is soon, then there is no quicker way to provide configurable features then via a config directive.
Will my feature need to be configured on a blog-by-blog basis? If so, then a config directive is not likely to be an ideal solution.
Template Tags - A Complete Reference
Welcome to a complete reference on one of the most common ways in which developers seek to customize and extend Movable Type: the creation of new template tags. If you are still unfamiliar with the basics of creating a Movable Type plugin, we suggest you start there, and then come back here to learn more.
Before we dive into creating our own tags, let’s make sure we understand the basics of what a tag is.
What is a template and a template tag?
A template is a file that is processed by Movable Type to produce a text file suitable for web publishing, such an HTML file (which is most common), a PHP file, a JavaScript file, a CSS file, etc.
Designers utilize template tags within a template to easily parameterize the output of the template itself.
In many respects, Movable Type’s templating language, the collection of all of Movable Type’s template tags, is a programming language unto itself. It is as functional as PHP and JavaScript, but has more in common with HTML as it utilizes a more semantic, tag or markup oriented approach to templating.
Let’s compare Movable Type’s templating language side-by-side with PHP:
PHP
<html>
  <head>
    <title><?php echo $BLOG_NAME; ?></title>
  </head>
  <body>...</body>
</html>
Movable Type Template Tag Syntax
<html>
  <head>
    <title><mt:BlogName></title>
  </head>
  <body>...</body>
</html>
As you can see they are virtually identical. We will leave the debate of language aesthetics to the uber-geeky.
Types of Template Tags
Now that we grok what a template tag is, let’s get on our way to creating our own. First, Movable Type supports two different types of tags. They are:
- function
- block
Function Tags
Function tags are atomic and simply output text in place of the tag itself.
Examples
<mt:BlogURL>- display the blog’s URL<mt:EntryTitle>- display an entry’s title<mt:EntryPermalink>- display the full URL to an entry’s permalink<mt:Link id="javascript">- display the URL to the template with the id of “javascript”
Block Tags
Block tags can contain other tags or text. They enclose text by an opening and closing tag like so:
<mt:Entries lastn="5">
Your HTML here.
</mt:Entries>
Examples
<mt:Entries>- loop over a set of entries<mt:Comments>- loop over a set of comments<mt:IfRegistrationEnabled>- conditionally display the contents of the tag if registration is enabled on this blog
Declaring Template Tags
All template tags are first declared in the plugin’s config.yaml file. In the following example we are going to define four different template tags to illustrate each of the following:
- How to declare a function tag
- How to declare a tag that loops
- How to declare a conditional tag that will show and hide content based upon a variable
- How to parameterize template tags to take arguments or input
Here are the tags we will define in this example:
<mt:SaySomething>- will output the word “Something”<mt:LoopTenTimes></mt:LoopTenTimes>- will output the contents contained by the tag 10 times<mt:SayWhatever>- will output the word you input<mt:IfOdd></mt:IfOdd>- will output the contents contained by the tag only if the iteration through the loop is odd
Registering Your Tags
First up: your config.yaml file. The following sample shows how to register each of the four tags this example will illustrate:
name: Example Plugin for Movable Type
id: Example
description: This plugin is an example plugin for Movable Type.
version: 1.0
tags:
    function:
        SaySomething: $Example::Example::Plugin::SaySomething
        SayWhatever: $Example::Example::Plugin::SayWhatever
    block:
        LoopTenTimes: $Example::Example::Plugin::LoopTenTimes
        IfOdd?: $Example::Example::Plugin::IfOdd
Note: the use of single quotes is used around template tags here because the conditional tag includes a ‘?’ which requires quotation marks in order to be valid YAML.
Registering Conditional Tags
Conditional tags are a special kind of block tag. They work by enclosing content by an opening and closing tag, like any other block tag. However their handler (their perl code) is much simpler. A conditional tag hander need only return true or false. If the handler returns true, then the contents of the tag will be displayed. If the handler returns false then the contents of the tag will be ignored.
Conditional tags are differentiated from a normal block tag by appending a question mark ‘?’ to the tag’s name. When you do this, be sure to encapsulate the template tag in apostrophe’s or Perl might complain about a YAML syntax error.
Defining the Tag’s Behavior
Once the tags have been declared in your config.yaml it is time to write the code that will govern their behavior.
Create a plugin module called
Plugin.pmin the following directory:/path/to/mt/plugins/Example/lib/Example/
Edit
Plugin.pmand cut and paste the following into it using a text editor (don’t worry, we will deconstruct how all of this works soon enough):package Example::Plugin; use strict; sub SaySomething { my ($ctx, $args) = @_; return "Something"; } sub SayWhatever { my ($ctx, $args) = @_; # What the person passed in through the argument 'say' my $input = $args->{'say'}; return $input; } sub LoopTenTimes { my ($ctx, $args, $cond) = @_; my $out = ""; for (my $i = 1; $i <= 10; $i++) { $ctx->stash("current_loop_number",$i); defined(my $txt = $ctx->slurp($args,$cond)) or return; $out .= "$i - $txt"; } return $out; } sub IfOdd { my ($ctx, $args, $cond) = @_; my $num = $ctx->stash('current_loop_number'); if ($num % 2 == 0) { return 0; } else { return 1; } } 1; # Every module must return true
Once this plugin has been created, the following template code can be used:
<mt:LoopTenTimes>
  <mt:IfOdd>
    <mt:SaySomething>
  <mt:Else>
    <mt:SayWhatever say="I am even!">
  </mt:IfOdd>
</mt:LoopTenTimes>
When processed through Movable Type, the above template code will output the following text:
1 - Something
2 - I am even!
3 - Something
4 - I am even!
5 - Something
6 - I am even!
7 - Something
8 - I am even!
9 - Something
10 - I am even!
Ok. We blazed through that, and we didn’t even explain the perl code at all. In the next section we will deconstruct what some of those tag handlers were doing in an effort to shed some light on Movable Type’s inner workings.
The Template Context
When a template is being published, a “context” is maintained while the page is processed and subsequently published. Template tags can store variables and information in the context to be used by other tags. This is the best way to maintain state during the process of publishing a page.
To store or retrieve a variable, use the “stash” method.
Storing values in the stash
sub handler {
     my ($ctx, $args, $cond) = @_;
     $ctx->stash("some stash key", "some value");
}
Retrieving values from the stash
sub handler {
     my ($ctx, $args, $cond) = @_;
     my $value = $ctx->stash("some stash key");
     # do something
}
How does this relate to our previous example. Let’s take a look:
 1 sub LoopTenTimes {
 2     my ($ctx, $args, $cond) = @_;
 3     my $out = "";
 4     for (my $i = 1; $i <= 10; $i++) {
 5         $ctx->stash("current_loop_number",$i);
 6         defined(my $txt = $ctx->slurp($args,$cond)) or return;
 7         $out .= "$i - $txt";
 8     }
 9     return $out;
10 }
You should notice two things. The first might be a call to the enigmatic slurp() method. The slurp method performs the simple function of returning the results from evaluating the contents or template code contained by the block tag. In the code sample above, this method is used to prepend to the evaluated template code the loop count each time the loop is iterated over.
Secondly, you may notice that within the for loop we are placing an element onto the stash. The name of this item is current_loop_number. Each time through the loop it is updated to store the number of times the loop has been processed up until that point in time.
Once it is stashed, we can reference it later and in another tag.
sub IfOdd {
    my ($ctx, $args, $cond) = @_;
    my $num = $ctx->stash('current_loop_number');
    if ($num % 2 == 0) {
        return 0;
    } else {
        return 1;
    }
}
You will notice that the IfOdd handler then retrieves this element off of the stash and if the number retrieved is an odd number the handler returns true, or 1, else it returns false or 0. In this way, the template context’s stash is a way for developers to maintain the state of the template and template tag(s) being processed.
Throwing Errors from Your Template Tags
At any point in any of your template tag handlers you may encounter a condition under which the best course of action is to terminate the publishing process and return an error. In these situations one can utilize the template context to return an error, complete with an error message that will be displayed to the user. For example:
sub handler {
  my ($ctx, $args, $cond) = @_;
  # do something
  if (<error condition>) {
      return $ctx->error("Something went horribly wrong.");
  }
  return $html;
}
Parsing Template Tag Arguments
The behavior of template tags can be modified programmatically through the use of template tag arguments. These arguments can be used to customize the output of a template tag according to the developer/designer’s design. For example:
<MTEntries lastn="2" sort="created_on"></MTEntries>
In the example above, both “lastn” and “sort” are template tag arguments. Accessing the values passed to these template tags is done via the following code sample:
sub handler {
  my ($ctx, $args, $cond) = @_;
  my $lastn = $args->{lastn};
  my $sort = $args->{sort};
  # do something
}
Template Tag Modifiers
Template Tag Modifiers are a special kind of template tag that do not exist as a tag literally, e.g. <mt:SomeTagModifier>. Instead, a template tag modifier is a type of template tag argument that has the ability to transform the contents of the tag it is associated with.
The following are some of the template tag modifiers that Movable Type ships with by default:
capitalize - convert all the characters output by the tag to uppercase.
replace - perform a simple string substitution on the contents of the tag.
word_count - instead of returning the contents directly, return an integer reflecting the number of words contained by the tag.
ltrim and rtrim - remove white space from the left/right of the tag’s contents.
And many more of course. Here are some examples using some of the tags above:
<mt:Entries id="40" capitalize="1"><mt:EntryBody></mt:Entries>

<mt:Var name="foo" replace="Byrne Reese","BR">
The following reference will walk you through the process of defining your own template tag modifiers.
Registering Your Tag Modifier
As with any plugin feature, the first step is always a visit to the config.yaml. Here is a sample config.yaml file for declaring a template tag modifier:
name: Example Plugin for Movable Type
id: Example
description: This plugin is an example plugin for Movable Type.
version: 1.0
tags:
    modifier:
        lolcats:
            handler: $Example::Example::Plugin::lolcats
Defining Your Tag Modifier’s Behavior
Once the tags have been declared in your config.yaml it is time to write the code that will govern their behavior.
Create a plugin module called
Plugin.pmin the following directory:/path/to/mt/plugins/Example/lib/Example/
Edit
Plugin.pmand cut and paste the following into it using a text editor:package Example::Plugin; use strict; sub lolcats { my ($str, $val, $ctx) = @_; return "LOL - CAN I HAZ A $str"; } 1; # Every module must return true
When a template tag modifier is invoked, Movable Type will pass three arguments to the handler. They are:
str- The value of the template tag’s content.val- The value passed into the global modifier attribute. If multiple values are passed, thenvalwill be an ARRAY.ctx- A reference to the template’s context.
Passing Multiple Parameters into a Tag Modifier
One advanced capability that is utilized by the regex_replace modifier is the ability to pass multiple arguments into the modifier directly.
The regex_replace modifier requires two parameters from the user: a) the pattern to search for, and b) the string to replace matches with. For example, the following example will replace all occurrences of the word “cat” with “dog” within the entry’s body:
<mt:EntryBody regex_replace="/cat/g","dog">
This is equivalent to the the regular expression:
s/cat/dog/g
Suppose you wanted to augment regex_replace to take an optional third parameter which would indicate whether the pattern should be evaluated in a case insensitive manner. The modifier’s handler would then look like this:
sub _fltr_regexreplace {
    my ($str, $val, $ctx) = @;
    # This one requires an array
    return $str unless ref($val) eq 'ARRAY';
    my $patt = $val->[0];
    my $replace = $val->[1];
    my $options = $val->[2] ? "i" : "";
    if ($patt =~ m!^(/)(.+)\1([A-Za-z]+)?$!${options}) {
        $patt = $2;
        my $global;
        if (my $opt = $3) {
            $global = 1 if $opt =~ m/g/;
            $opt =~ s/[ge]+//g;
            $patt = "(?$opt)" . $patt;
        }
        my $re = eval { qr/$patt/ };
        if (defined $re) {
            $replace =~ s!\\(\d+)!\$1!g; # for php, \1 is how you write $1
            $replace =~ s!/!\/!g;
            eval '$str =~ s/$re/' . $replace . '/' . ($global ? 'g' : '');
            if ($@) {
                return $ctx->error("Invalid regular expression: $@");
            }
        }
    }
    return $str;
}
Wow, that is some super serious perl code. Let’s focus on just the parts that are relevant to passing arguments:
1 sub _fltr_regex_replace {
2    my ($str, $val, $ctx) = @_;
3    # This one requires an array
4    return $str unless ref($val) eq 'ARRAY';
5    my $patt = $val->[0];
6    my $replace = $val->[1];
7    my $options = $val->[2] ? "i" : "";
Line 4 is useful because it tests to see if $val is an array or not. If it is not then it aborts the regular expression and returns the value of $str unmodified.
Line 5, 6 and 7 show how you reference the first, second and third arguments passed into the modifier respectively.
Text Filters
One of the very first Movable Type plugins ever created was a simple text filter. Text filters are used to transform the plain text input by a user into the entry and page editing interfaces, or through a commenting form into some other format. This first plugin called “Convert Line Breaks” made it possible for someone to enter the follow text into Movable Type:
Last night I had a great time with some friends.

We went to a restaurant and then a movie.
To the following:
Last night I had a great time with some friends.<br />
<br />
We went to a restaurant and then a movie.
The added break tags (<br />) helps preserve the formatting of the original text without requiring the user to know HTML.
Movable Type ships with several built in text filters, including:
- Markdown
- Textile
- SmartyPants
- Convert line breaks
Each of these text filters converts the text written in an alternate markup into the corresponding HTML syntax. However, there are many other possible uses for a text transformation plugin including one that may auto-correct spelling, automatically link certain words to specific websites, etc.
Note: The text entered by the user is stored in the database in its original form. The transformation occurs at the time the entry is published only.
To register a text filter, use the following code sample:
name: Example Plugin for Movable Type
id: Example
description: This plugin is an example plugin for Movable Type.
version: 1.0
text_filters:
    mytransform:
        label: My Text Transform
        handler: $Example::Example::Plugin::mytransform
        condition: $Example::Example::Plugin::mytransform_when
There are a number of properties for a text filter that can used when registering the text filter with Movable Type. These options are:
label - the display name of the text filter as it will appear in the Movable Type user interface
handler - a reference to a subroutine responsible for handling the transformation
condition - in the event that the text filter should only be applied under specific conditions, one can identify a reference to a subroutine that will return true if the filter can be applied, and false otherwise.
Text Filter Handler
The text filter handler is simple. It takes a single argument as input: the text being transformed. It then is responsible for returning the transformed text.
The example below works by converting all instances of the word “cat” with “dog.”
package Example::Plugin;
use strict;

sub mytransform {
    my ($str) = @_;
    $str =~ s/\bcat\b/dog/mg;
    return $str;
}

1; # Every module must return true
Conditional Text Filtering
In the code sample above where a text filter is registered with Movable Type, a condition is defined under which text filtering is allowed. The call back determines whether or not the text filter can be selected by a user via the web interface. The callback is called with a single parameter, the type of the object being transformed. Allowable values for the object type are:
- “entry”
- “comment”
The callback should return “1” if filtering is allowed, and “0” otherwise.
# Will only allow the text filter to be applied to comments
sub transform_when {
    my ($obj_type) = @_;
    return 1 if $obj_type && ($obj_type eq 'comment');
}
Custom OpenID Login Screens
You are starting to get the hang of this aren’t you? Good, because we are going to switch gears for a second. This will your first plugin that modifies the Movable Type user interface a bit, specifically Movable Type’s login screen.
OpenID is a decentralized authentication protocol that allows systems to delegate authentication and registration to a third party.
Ok, now in English.
OpenID is a feature that allows people to login into Movable Type without having to create a username and password. Instead, users login to Movable Type via a third party like Flickr, Yahoo, AOL, etc.
Movable Type has built in support for OpenID thereby allowing readers to authenticate against any OpenID endpoint in order to leave a comment.
Why Custom OpenID Login Screens are Needed
Security
Not all OpenID endpoints are necessarily trustworthy. Therefore, administrators may wish to give preferential treatment to specific OpenID providers by designing a customized login experience optimized for a specific OpenID endpoint. In addition they may also disable generic OpenID logins, and selectively enable support for only a specific set of OpenID providers. In this way they can bring greater security to their system.
Usability
OpenID is still relatively new, and not every user on the internet understands yet what an OpenID is. For example, both Vox and LiveJournal, two different products, support OpenID. However, many users do not know what their OpenID URL is on these services, much less that they have one at all.
As a consequence they are either unable to or unaware that they can authenticate via those services to leave a comment on virtually any Movable Type blog.
To assist these users Movable Type has provided a specially designed login form for each service to collect the specific information needed in order to formulate an OpenID for each service.
Registering Your OpenID Endpoint
The following example will show you how to provide your users with a customized login experience for an OpenID provider of your choice. What follows is a slightly modified version of the LiveJournal comment authenticator found natively in Movable Type.
Warning: Brace yourself, this is the most complex config.yaml we have seen up until this point. But don’t worry, most of it is HTML. Immediately after the example we will explain what all this means.
name: Example Plugin for Movable Type
id: Example
description: This plugin is an example plugin for Movable Type.
version: 1.0
commenter_authenticators:
    livejournal:
        label: 'LiveJournal'
        class: 'Example::MyOpenIDAuth'
        login_form_params: $Example::Example::OpenIDAuth::commenter_auth_params
        condition: $Example::Example::OpenIDAuth::openid_commenter_condition
        logo: 'images/comment/signin_livejournal.png'
        login_form: <<LiveJournal,
<form method="post" action="<mt:var name="script_url">">
<input type="hidden" name="__mode" value="login_external" />
<input type="hidden" name="blog_id" value="<mt:var name="blog_id">" />
<input type="hidden" name="entry_id" value="<mt:var name="entry_id">" />
<input type="hidden" name="static" value="<mt:var name="static" escape="html">" />
<input type="hidden" name="key" value="LiveJournal" />
<fieldset>
<mtapp:setting
    id="livejournal_display"
    label="<__trans phrase="Your LiveJournal Username">">
<input name="openid_userid" style="background: #fff
    url('<mt:var name="static_uri">images/comment/livejournal_logo.png')
no-repeat left; padding-left: 18px; padding-bottom: 1px;
border: 1px solid #5694b6; width: 304px; font-size: 110%;" />
<p class="hint"><__trans phrase="Sign in using your LiveJournal username."></p>
</mtapp:setting>
<div class="pkg">
  <p class="left">
    <input type="submit" name="submit" value="<MT_TRANS phrase="Sign In">" />
  </p>
</div>
<p><img src="<mt:var name="static_uri">images/comment/blue_moreinfo.png">
  <a href="http://www.livejournal.com/"><__trans phrase="Learn more about LiveJournal."></a>
</p>
</fieldset>
</form>
LiveJournal
Comment Authenticator Properties
If you strip out all the HTML and template code from the above, you will actually find that the registry for OpenID endpoints is pretty simple:
class- the class or package name of the handler for processing form input andlabel- the display name of the service as it will appear to an end user of the applicationlogin_form_params- a subroutine responsible for populating the template context the necessary parameters to properly render the login form for the corresponding servicecondition- the conditions under which this OpenID endpoint will be displayed as an option to the user. This allows for developers to specify prerequisites that if not satisfied will prevent users from authenticating via this endpoint.logo- a small 16x16 logo used to identify users who have authenticated via this endpointlogin_form- A reference to a template file, or the raw template code for the login form. This text can contain MT template tags that will be evaluated when the form is displayed to the user. The login form must contain at least one input parameter called ‘openid_userid’. This parameter is used later to construct the OpenID endpoint or URL.
Next, let’s look at the Perl code associated with an OpenID comment authenticator.
Authentication Handler
This code sample is a little bit different. We will not be utilizing the Plugin.pm file as we have done in previous examples. An OpenID endpoint requires us to create a file dedicated to this one purpose. Let’s create it:
Create a directory called:
/path/to/mt/plugins/Example/lib/Example
In that directory create a file called
MyOpenIDAuth.pmand open it in a text editorStart by adding the following text to your
MyOpenIDAuth.pmfile:package Example::OpenIDAuth; use strict; use base qw( MT::Auth::OpenID );
This is not a working code sample yet. What you should notice is that this plugin inherits from the MT::Auth::OpenID class reducing the amount of code you need to write substantially. All we have to do is customize a few of the functions.
The class property within the registry identifies the authentication handler for the corresponding OpenID endpoint. We need to make sure that the value of class points to the file we created above.
Complete Code Sample
Let’s look at the complete MyOpenIDAuth.pm file now:
package Example::OpenIDAuth;
use strict;
use base qw( MT::Auth::OpenID );
sub url_for_userid {
my $class = shift;
my ($uid) = @_;
return "http://www.livejournal.com/users/$uid";
};
sub _get_nickname {
my ($vident, $blog_id) = @_;
## LJ username
my $url = $vident->url;
if( $url =~ m(^https?://www\.livejournal\.com\/users/([^/]+)/$) ||
$url =~ m(^https?://www\.livejournal\.com\/~([^/]+)/$) ||
$url =~ m(^https?://([^\.]+)\.livejournal\.com\/$)
) {
return $1;
}
*MT::Auth::OpenID::_get_nickname->(@_);
}
sub commenter_auth_params {
my ( $key, $blog_id, $entry_id, $static ) = @_;
my $params = {
blog_id => $blog_id,
static => $static,
};
$params->{entry_id} = $entry_id if defined $entry_id;
return $params;
}
sub openid_commenter_condition {
eval "require Digest::SHA1;";
return $@ ? 0 : 1;
}
1;
How it all works
The example above shows the authentication handler for a LiveJournal OpenID endpoint. This handler is responsible for translating the input from the user submitted from the login form into a valid OpenID URL. For example, the template we registered (remember all that HTML above?) prompts the user for their LiveJournal username. The authentication handler converts that username into the corresponding OpenID URL:
http://username.livejournal.com
The user ID submitted by the user is what is responsible for translating a user’s input into a valid OpenID URL using the url_for_userid subroutine in the above code sample.
Once a user has successfully logged in, Movable Type needs to extract a nickname or display name from the OpenID URL returned by the OpenID service provider. This is used for example to indicate the name or nickame of the person leaving a comment. This nickname extraction is performed by the _get_nickname subroutine. In the event the nickame cannot be detected or extracted from the URL returned by the provider, the subroutine below instructs the default Movable Type OpenID handler to return the default nickname.
Registering Additional Ping Servers
When new entries are created, and “External Notifications” are enabled for a given blog, then Movable Type will optionally ping a set of services chosen by the user or system administrator. These “pings” notify the designated services of new content that is available on your blog or web site. This list of ping services is easily extended by registering new pingable endpoints via the Movable Type registry.
The following config.yaml demonstrates how to register a new ping server:
name: Example Plugin for Movable Type id: Example description: This plugin is an example plugin for Movable Type. version: 1.0 ping_servers: myping: label: ‘My Ping Service’ url: ‘http://ping.somedomain.com/foo’
When registering a ping server, the following properties must be specified:
label - The display name of the ping server that will be presented to the user from within the application
url - The url to ping when the service is selected by the user
Scheduled Tasks
Movable Type allows plugin developers to register tasks that should be executed outside the context of the main application. These tasks can be scheduled to occur at a designated frequency.
Tasks are run via one of two ways:
- through the use of the
run-periodic-tasks.plframework - through the web interface
Note: For the last case above it is important to note that scheduled tasks will only be executed if a user accesses the administrative interface at a time when a task is due to be executed. One common tip recommended by the community is to subscribe to your system’s Activity Feed in Google Reader. This will result in a third party hitting the main Movable Type application, and by consequence trigger any background tasks that are due to be run.
To create a task, you will first need to edit your config.yaml file and register your task according to the example below.
name: Example Plugin for Movable Type
id: Example
description: This plugin is an example plugin for Movable Type.
version: 1.0
tasks:
    MyCustomTask:
        label: Do something every two minutes
        frequency: 120
        code: $Example::Example::Plugin::exec_task
When registering a scheduled task, the following properties must be specified in the registry:
- label - the display name of the scheduled task as it will appear in the application (e.g. the Activity Log)
- frequency - the minimum time (in seconds) between allowed execution of the task
- code - a reference to a subroutine or code block that will be executed when the scheduled task is triggered
Task Handler
Once the task has been registered you will need to edit your Plugin.pm file and add a task handler. This task handler will take no input. It is just a static method that will be invoked by Movable Type.
package Example::Plugin;
use strict;

sub execute_task {
    # no input is passed to this callback
    # do something
}

1; # Every module must return true
Turning on Scheduled Tasks
Scheduled tasks are managed and executed by a script that is shipped with Movable Type. This script called run-periodic-tasks and should be executed by cron (in Unix) or via Scheduled Tasks (in windows). You can run it as often as you like, but any tasks with a frequency setting will be skipped if the last execution of that task falls within that window of time.
Creating a New Spam/Junk Filter
The architecture of Movable Type’s spam detection and filtering framework was inspired by the now ubiquitous Spam Assassin spam filtering system used for email. It works by chaining multiple filters together and then aggregating the score that emanates from each filter. The aggregate score is then used to determine if a comment is spam or ham. “Ham” of course refers to any comment that is not spam — aren’t geeks funny?
Each filter can influence the aggregate score in either a negative (hammy) or positive (spammy) way, by returning a number between -10 and 10 respectively. In other words, some plugins may focus on identifying ham, rather then trying to detect spam.
Registering a spam or junk filter is done through the Movable Type registry like so:
name: Example Plugin for Movable Type
id: Example
description: This plugin is an example plugin for Movable Type.
version: 1.0
junk_filters:
    my_antispam:
        label: 'My AntiSpam'
        code: $Example::Example::Plugin::spam_score
Your junk filter will need to point to a handler through which each comment received will be processed. Now let’s define the handler itself.
As we all know, the “e” character is eeevil. So here is a plugin to detect any E’s in an incoming feedback and place a high junk score on items that have a lot of those monsters.
package Example::Plugin;
use strict;

sub spam_score {
    my ($obj) = @_;
    # count the number of E's in the comment
    my @es = $obj->all_text =~ m/(e)/gi;
    my $count = scalar @es;
    # generate your score
    my $score = (2 ** $count - 1);
    return MT::JunkFilter::ABSTAIN() if ($score <= 0);

    return (-$score, "Contained $count 'e' characters");
}
1;
In the above example two possible values are returned. The first is MT::JunkFilter::ABSTAIN(). Returning ABSTAIN will result in this filter being skipped and excluded from contributing to the overall score for the associated comment or TrackBack. The second possible return value is returned if the handler elects to report a score for the comment or TrackBack. In that instance, the handler returns an array containing two values: the score, and a text message that will be recorded in the log stating the reason the comment was scored the way it was. This message is made visible within the Movable Type application to administrators so that they can better understand why a comment was flagged or not flagged as spam, and adjust their filters accordingly.
Computing the Aggregate Junk Score
Movable Type calculates the aggregate score, but taking a simple average of all of the scores contributed by all the filters associated with a TrackBack or comment.
It is important to remember that returning the score of zero is not the same as abstaining for voting in the first place. To help illustrate, consider the effect a zero can have in an average. If a comment has two scores it is averaging, say 0 and 10, then the resulting score will be 5.
Junk Handler Return Values
MT::JunkFilter::ABSTAIN()- returning this value will result in the current filter being skipped and excluded completely from contributing to the overall aggregate score of the associated comment or TrackBack.MT::JunkFilter::HAM()MT::JunkFilter::SPAM()MT::JunkFilter::APPROVE()MT::JunkFilter::JUNK()
Note: the maximum and minimum value for any junk score is 10 and -10 respectively. Exceeding these limits will force Movable Type to round your returned score to the nearest floor or ceiling.
Junk Thresholds
Within Movable Type users can adjust their junk “threshold.” One can think of a threshold in terms of “how spammy must a comment be before I force it into the junk folder?” By default the threshold is zero.
 Spam                                            Ham
 |----|----|----|----|----|----|----|----|----|----|
-10  -8   -6   -4   -2    0    2    4    6    7   10
                          ^
                          +-- threshold
By adjusting the threshold you can fine tune and calibrate Movable Type to filter comments according to your needs. In the example above, any comment with a score to the left of the threshold will be regarded as spam, and anything to the right will be ham. By moving the threshold to the left, then more comments will be rated as ham.
Callbacks for Handling Spam and Ham
Many anti-spam plugins may also want to provide users with the ability to report both false negatives (those comments that were reported as spam, but are indeed ham), and false positives (those comments that were reported as ham, but are in fact spam) so that the system can adapt to its mistakes. This allows for the potential for a system to learn from misreported values. The TypePad AntiSpam plugin is just such a system. In fact, it is the very basis for the entire service - enabling an entire community of users to collaboratively train a system as to what is ham or spam.
Therefore a developer may want to be notified when a user reclassifies a comment as spam or ham. To do this, they would register a handle_spam and/or a handle_junk callback as in the example below:
name: Example Plugin for Movable Type
id: Example
description: This plugin is an example plugin for Movable Type.
version: 1.0
callbacks:
    handle_spam: $Example::Example::Plugin::handle_spam
    handle_ham: $Example::Example::Plugin::handle_ham
Your plugin’s Plugin.pm file would then need to contain the following handlers:
package Example::Plugin;
use strict;
sub handle_spam {
    my ($cb, $app, $thing) = @_;
    # do something
}
sub handle_ham {
    my ($cb, $app, $thing) = @_;
    # do something
}
1;
The return values of these handlers is ignored. All these callbacks enable is the opportunity to take some action on the related comment or TrackBack (“$thing” in the above code sample).
Custom Custom Field Types
Custom Fields are feature available exclusively in Movable Type Pro. Custom Fields allow an entry, page, category, folder or user to be extended with additional data elements that a user can edit from within the Movable Type application. Movable Type provides the most common form elements or “custom field types” right out of the box, such as:
- single line text field
- multi-line large text area
- radio buttons
- pull-down menus
- etc.
A custom field type governs what the input element looks like on the edit page or edit entry screen for example, and what is stored as the value for that custom field in the database.
Sometimes the choices available are not adequate, and a developer would like to define a new form element or custom field type. For example, suppose you want to allow authors to select a different sidebar (or “widget set”) from a pull down menu for each entry and/or page? Such an option doesn’t exist by default.
The following example will show how to create a custom “Custom Field Type” that a user can use to associate with a page or entry. The custom field could then allow them to select from a pull down menu the widget set that they would like to have associated with the current entry or page. Here is an example config.yaml file for this plugin:
name: Example Plugin for Movable Type
id: Example
description: This plugin is an example plugin for Movable Type.
version: 1.0
customfield_types:
    widget_set_type:
        label: 'Widget Set'
        field_html: $Example::Example::Plugin::field_html
        no_default: 1
        order: 500
        column_def: 'string(255)'
Registry Properties
- label - the display name of the custom field type. This is what will appear in the pull down menu associated with the custom field type on the create custom field screen.
- field_html - The HTML and template code that will be used to render the custom field on the edit page/entry screen. This can reference a handler that can return the HTML as well.
- field_html_params - this is a reference to a handler that can manipulate the input parameters associated with the current object and screen inside the application.
- no_default - a boolean value (1 or 0) associated with whether the field should be forced into having a default value associated with it.
- options_field - The HTML to be used on the edit custom field screen to allow the custom field to have associated with it any additional configuration options.
- options_delimiter - when specified, the value of this property will be used to split the
optionsstring into an array of multiple values that can be looped over in yourfield_htmlhandler. - order - an integer referring to the placement of the custom field relative to other fields on the edit entry/page screens.
- context - can be given a value of “blog” (default) or “system” and governs whether the custom field is available exclusively at a system level, or is available at a blog level as well.
- column_def - the datatype of the associated custom field type. Permitted data types are:
vcharvchar_idxvintegervinteger_idxvdatetimevdatetime_idxvfloatvfloat_idxvblobvclob
The following is an example Plugin.pm associated with the above example config.yaml. It defines the various handlers associated with each of the possible registry properties.
package Example::Plugin;
use strict;

sub field_html {
    my $app = MT->instance;
    my $blog = $app->blog;

    my $html = q{<select name="<mt:var name="field_name">"
       id="<mt:var name="field_id">">};

    my $wm = MT::Plugin::WidgetManager::instance();
    my $modulesets =
        $wm->load_selected_modules($app->blog->id) || {};
    my @names = sort keys %$modulesets;

    $html .= q{<option value="" <mt:if name="field_value" eq="">
       selected="selected"</mt:if>>None Selected</option>};
    foreach my $n (@names) {
        $html .= q{<option<mt:if name="field_value" eq="}.$n.q{">
        selected="selected"</mt:if>>}.$n.q{</option>};
    }
    $html .= '</select>';
    return $html;
}
HTML Field Parameters
Sometimes a custom field needs to access the parameters associated with other fields, or other parameters associated with the edit form rendering the custom field. An example of this might be when a custom field that contains a date/time value needs to default to a date associated with the creation time of the object being edited. The following example shows a trivial example of how a developer can register a handler that can access and/or modify template parameters.
First, the config.yaml:
customfield_types:
    my_cf_type:
        label: 'My Custom Field Type'
        field_html_params: $Example::Example::Plugin::field_html_params
        order: 500
And now, the Plugin.pm file:
sub field_html_params {
    my ($key, $tmpl_key, $tmpl_param) = @_;
    my $app = MT->instance;
    my $blog = $app->blog;
    $tmpl_param->{'param_name'} = "foo";
}
Custom Field Options
Some custom fields may need to accept options beyond the standard set of parameters associated with a custom field. An example of this might be a radio button. A radio button needs to give administrators the ability to define multiple radio button values to choose from.
To give this ability to an admin, a developer needs to register an options_field handler with the custom field. This handler need only return valid HTML with, or with MT template code. Movable Type will then render that code on the edit form for the custom field itself.
The following example pulls from Movable Type itself, and shows how you can define a custom radio button type. First the config.yaml:
customfield_types:
    my_radio:
        label: 'My Radio'
        field_html: $Example::Example::Plugin::field_html
        options_field: $Example::Example::Plugin::options_field
        options_delimiter: ','
        order: 500
You will notice that in this example you will need to define not only the options_field, but also customize the field_html. The HTML returned by the field_html handler needs to be able to loop over each of the values defined and stored in the custom fields options value. When an options_delimiter is also defined, Movable Type will automatically split the options value into an array and make available a template parameter called option_loop that contains each of the values entered by the administrator.
Here is an excerpt from the Plugin.pm file that contains the two handlers needed by this example:
sub options_field {
    return q{
    <div class="textarea-wrapper"><input type="text" name="options"
       value="<mt:var name="options" escape="html">" id="options" class="full-width" />
    </div>
    <p class="hint">
    Please enter all allowable options for this field as a comma delimited list.
    </p>
    };
}

sub field_html {
      return q{
    <ul class="custom-field-radio-list">
    <mt:loop name="option_loop">
    <mt:if name="option"><li><input type="radio" name="<mt:var name="field_name">"
      value="<mt:var name="option" escape="html">" id="<mt"var name="field_id">_<mt:var
      name="__counter__">"<mt:if name="is_selected"> checked="checked"</mt:if> class="rb"
      /> <label for="<mt:var name="field_id">_<mt:var name="__counter__">"><mt:var
      name="option" escape="html"></label></li></mt:if>
    </mt:loop>
    </ul>
    };
}
Upgrade Functions
As a plugin evolves it is not uncommon for a developer to want to change a fundamental way a plugin stores its data. If the developer cares about backwards compatibility (and we all do right?) then they will often need to have some way to help transition users in a completely seamless manner to the new scheme.
Movable Type facilitates this process through the use of upgrade functions. Upgrade functions are registered for a specific object class (like “entry,” “page” or “author”). Then for each record associated with that class, Movable Type will pass that record to a function for tweaking and modification. Upgrade functions are also associated with a specific schema version, that way Movable Type is ensured only to run the function for those users for which the upgrade function is relevant, and only against a specific version of the schema.
Developers can also register raw SQL code to be run against the database if that is easier.
name: Example Plugin for Movable Type
id: Example
description: This plugin is an example plugin for Movable Type.
version: 1.2
schema_version: 10
upgrade_functions:
    my_function:
        version_limit: 9
        priority: 1
        updater:
            type: entry
            label: "Doing something to all entries."
            condition: $Example::Example::Plugin::my_upgrade_condition
            code: $Example::Example::Plugin::my_upgrade_function
            sql: $Example::Example::Plugin::my_upgrade_sql
Upgrade Function Registry Properties
- version_limit - the schema version for which this upgrade function should be run against. For example, if a user is upgrading from schema version 5 to 6, then the version limit would be set to 5 indicating that the upgrade function should not be run if the current schema version is greater than 5.
- priority - this is used to determine the order in which a set of upgrade functions should be run. (1 has the highest priority ensure that it will be run first)
Updater Registery Properties
- type - the object class for which this upgrade function applies. This also determines the type of the object that will be passed into each of the related handlers.
- label - The text that is displayed to the administrator during the upgrade process to provide some insight into the operation being performed.
- condition - a handler that should return a boolean value, true if the associated upgrade handler should be run, and false otherwise.
- code - a reference to a handler to process each object in the system for which this upgrade function applies.
- sql - a reference to a hander that should return an array of SQL statements that should be run against the database.
Sample Plugin.pm File
Here is a sample set of handlers for each of the registry properties above.
package Example::Plugin;
use strict;

sub my_upgrade_function {
    my ($obj) = @_;
    $obj->some_property('some value');
}

sub my_upgrade_condition {
    my ($obj) = @_;
    return 0 if $obj->title eq "Foo"; # do not upgrade this record
    return 1; # upgrade this record
}

sub my_upgrade_sql {
    return (
      "UPDATE mt_entry SET some_property='xyz' WHERE title='Foo'",
      "UPDATE mt_entry SET some_property='123' WHERE title='Bar'",
    );
}
You should note that in the my_upgrade_function handler, as with all upgrade handlers, there is no need to issue a $obj->save() command with the corresponding object being upgraded. Movable Type will call the save() method on the object after all the upgrade functions associated with this schema version and this object type have been run.
Schwartz Workers
TheSchwartz is an open source reliable job queue framework leveraged by Movable Type to perform a number of tasks in the background. Dispatching tasks to the background is an excellent way of offloading large, time consuming and resource intensive tasks to a framework that can be more easily managed and metered. Movable Type uses TheSchwartz for example for background publishing.
TheSchwartz however could be used to offload virtually any task to the background. The following is a trivial example of how to register a Schwartz Worker with Movable Type via the registry, and then how to implement that worker.
name: Example Plugin for Movable Type
id: Example
description: This plugin is an example plugin for Movable Type.
version: 1.2
task_workers:
    my_worker:
        label: "Publishes content."
        class: 'MT::Worker::Publish'
The Difference Between Scheduled Tasks and Schwartz Workers
Scheduled tasks are run only at specific intervals and are executed by Movable Type via the web interface and via run-periodic-tasks. They are executed regardless of whether there is any known work to do, e.g. “check every 5 minutes to see if there are any scheduled posts that need to be published.” In this way, scheduled tasks act like a mini-cron within Movable Type.
Schwartz workers are spawned exclusively by the run-periodic-tasks script. Furthermore, Schwartz workers are only invoked when there is a job for them to perform. In other words, Movable Type must explicitly place a “Schwartz Job” on the queue in order for a corresponding “Schwartz Worker” to wake up and perform the designated work.
When should I use a scheduled tasks vs a Schwartz worker?
The general rule of thumb is that you should use a Schwartz worker if you believe that the task at hand could ever take longer than 30 seconds, or any length of time for which you think it would give users the impression that the application was slow or sluggish. This is due to the fact that scheduled tasks can be triggered by a user using the application, causing a periodic slow down as it processes a scheduled task.
One trick some developers use is to use a scheduled task to add a Schwartz job to the queue. That way you get the best of both worlds: a tasks that is assured to be processed at a designated interval, but very little risk for that task to slow down the application.
Schwartz Worker Class
Below is a sample Schwartz worker class. A worker extends the base class of TheSchwartz::Worker which provides the basic interface for workers in general. A Schwartz Worker is basically stateless - any state that typically needs to be maintained is done by TheSchwartz client, or dispatcher. For the most part, a worker need only define the following subroutines:
keep_exit_status_for- defines the number of seconds TheSwartz will keep a record of the exit status for this job. This allows you to keep a record around of past jobs for auditability and debugging purposes.grab_for- the time a worker will be allocated to perform the associated work. If this time is exceeded the job will timeout and the job will be marked as a failure, allowing other workers to pick up the job and attempt work on it again.max_retries- the maximum number of times to attempt performing this worker’s work. When this value is exceeded, the job is marked as completed (with errors) and is removed from the queue.retry_delay- the number of seconds to wait before attempting to perform this worker’s work again.work- performs the actual work associated with this worker.
The following is a shell of a Schwartz Worker class for Movable Type:
package MT::Worker::MyWorker;

use strict;
use base qw( TheSchwartz::Worker );

use TheSchwartz::Job;
use Time::HiRes qw(gettimeofday tv_interval);

sub keep_exit_status_for { 1 }
sub grab_for { 60 }
sub max_retries { 10 }
sub retry_delay { 60 }

sub work {
    my $class = shift;
    my TheSchwartz::Job $job = shift;
    my $s = MT::TheSchwartz->instance();
    my @jobs;
    push @jobs, $job;
    if (my $key = $job->coalesce) {
        while (my $job = $s->find_job_with_coalescing_value($class, $key)) {
            push @jobs, $job;
        }
    }
    foreach $job (@jobs) {
       # do something
    }
    return $job->completed();
}
1;
Adding a Schwartz Job to the Queue
To add a job to the queue for processing at the next opportunity, follow these steps:
- Instantiate a new
TheSchwartz:::Job. - Specify the class name of the worker for the job using
$job->funcname. - Provide an identifier of some kind for the worker to use in reference to the job at hand using
$job->uniqkey. This might be for example the ID of an entry that needs to be published. - Provide the priority of the task ranging from 1 (lowest) to 10 (highest) using
$job->priority. - Provide a key by which to group this job using
$job->coalesce. Some workers will attempt to look for other similar or related jobs on the queue to process all at once in order to maximize efficiency. - Finally, add the job to the queue using
MT::TheSchwartz->insert($job).
For example:
require MT::TheSchwartz;
require TheSchwartz::Job;
my $job = TheSchwartz::Job->new();
$job->funcname('MT::Worker::Publish');
$job->uniqkey( $fi->id );
$job->priority( $priority );
$job->coalesce( $blog_id );
MT::TheSchwartz->insert($job);
Keep in mind, that ideally individual jobs should perform small units of work. If you find that you need to process a large amount of work, consider breaking the task into smaller units. Also, there is no guarantee to the order in which jobs are processes, so make sure each job can be run independently from any other. If you require jobs to be processed in a specific order, consider having a job insert another job to process to next unit of work just prior to completing.
See Also
To learn more about TheSchwartz, please consult the official documentation:
http://search.cpan.org/~bradfitz/TheSchwartz-1.07/
Rich Text Editors
There are few topics as polarizing as what WYSIWYG editor one should use. Everyone has their own personal favorite and everyone has a reason to sincerely dislike another. Knowing that there was no rich text editor that we as a community could select that everyone would like, we opted to create an abstraction layer that let’s people plugin whatever editor they want. Several editors have already been made available to Movable Type through this system, including:
- YUI’s Editor
- TinyMCE
- FCK
If you would like to add support for a different editor, then you need to follow two simple steps:
Register the editor allowing a user to select it via their
mt-config.cgiconfiguration file.Create a template fragment that contains all the necessary HTML and Javascript to properly initialize and load the editor.
Here is the actual config.yaml for the YUI Rich Text Editor plugin:
name: YUIeditor
version: 1.0
author_name: David Davis
author_link: http://www.xantus.org/
description: Provides YUIeditor as a rich editor choice for Movable Type.
richtext_editors:
    yuieditor:
        label: YUIeditor
        template: yui_editor.tmpl
The template code then looks like this:
<mt:setvarblock name="js_include" append="1">
   <script type="text/javascript"
      src="<$mt:var name="static_uri"$>plugins/YUIeditor/js/yui_editor.js"></script>
</mt:setvarblock>
<mt:setvarblock name="html_head" prepend="1">

<link rel="stylesheet" type="text/css"
   href="http://yui.yahooapis.com/2.4.1/build/assets/skins/sam/skin.css">
<!-- -->
<link rel="stylesheet" type="text/css"
   href="http://yui.yahooapis.com/2.4.1/build/fonts/fonts-min.css?_yuiversion=2.4.1" />
<link rel="stylesheet" type="text/css"
   href="http://yui.yahooapis.com/2.4.1/build/container/assets/skins/sam/container.css" />
<link rel="stylesheet" type="text/css"
   href="http://yui.yahooapis.com/2.4.1/build/menu/assets/skins/sam/menu.css" />
<link rel="stylesheet" type="text/css"
   href="http://yui.yahooapis.com/2.4.1/build/button/assets/skins/sam/button.css" />
<link rel="stylesheet" type="text/css"
   href="http://yui.yahooapis.com/2.4.1/build/editor/assets/skins/sam/editor.css" />
<!-- -->
<script type="text/javascript"
  src="http://yui.yahooapis.com/2.4.1/build/utilities/utilities.js"></script>
<script src="http://yui.yahooapis.com/2.4.1/build/container/container_core-min.js"></script>
<script src="http://yui.yahooapis.com/2.4.1/build/menu/menu-min.js"></script>
<script src="http://yui.yahooapis.com/2.4.1/build/button/button-min.js"></script>
<script src="http://yui.yahooapis.com/2.4.1/build/editor/editor-beta-min.js"></script>
<script type="text/javascript">
    /* <![CDATA[ */
    if ( !defined( window.Editor ) )
        Editor = { strings: {} };
    else
        Editor.strings = {};
    /* ]]> */
</script>
</mt:setvarblock>

<mt:setvarblock name="editor_content">
<div id="formatted" class="editor-panel">
   <div id="entry-body-field" class="field">
   <div class="field-content">
   <mt:setvarblock name="editor_content_height">
     <mt:if name="disp_prefs_height_body">
        <$mt:var name="disp_prefs_height_body"$>
     <mt:else>194</mt:if>
   </mt:setvarblock>
   <div class="editor" id="editor-content-enclosure" mt:min-height="66"
      mt:update-field-height="editor-content-height"
      style="height: <$mt:var name="editor_content_height"$>px;
      position:relative; padding-bottom: 10px;"
      mt:edit-field="<mt:var name="toolbar_edit_field">"
      mt:blog-id="<mt:var name="blog_id">">
        <textarea tabindex="3" id="editor-content-textarea" name="_text_"
          class="full-width" style="background: #fff;
          height: <$mt:var name="editor_content_height"$>px">
          <$mt:var name="text" escape="html"$>
        </textarea>
        <input type="hidden" name="text_height" id="editor-content-height"
          value="<$mt:var name="editor_content_height"$>" />
        <input type="hidden" id="editor-input-content" name="text"
          value="<$mt:var name="text" escape="html"$>" />
        <input type="hidden" id="editor-input-extended" name="text_more"
          value="<$mt:var name="text_more" escape="html"$>" />
   </div>
   </div>
   </div>
</div>
</mt:setvarblock>
Advanced Developer Topics
By now you should really be getting the hang of building Movable Type plugins. It is amazing how much can be accomplished with so little code.
However, advanced Movable Type applications and plugins will make greater use of Movable Type’s native Perl API, and will also rely on a greater familiarity with programming fundamentals and design patterns.
In this section we will introduce you to the following topics:
- How to listen for and respond to events fired by Movable Type.
- How to create, load, save and delete objects stored in Movable Type.
- How to create your own Movable Type objects.
- How to extend existing Movable Type objects.
- Implementing key interfaces like Movable Type’s extensible authentication framework.
Events and Movable Type Callbacks
Movable Type exposes to developers a number of different “hooks” during the life-cycle of a request that a developer can attach their code to. In a sense, these hooks give plugins the opportunity to inject code and operations into the core of Movable Type’s application logic. This allows plugins to perform more advanced operations than Movable Type might otherwise perform on its own, while preventing developers from having to hack Movable Type’s source code directly.
This section will discuss in detail how to listen for these events, how to attach callbacks for those events, and how to trigger events of your own.
What is an event?
For those unfamiliar with the concepts of an event, let’s have a brief primer on the concept.
The most basic definition of an event could be, “a occurrence within a system that may be of relevance to applications extending it.” The most common form of an event can be found in your own operating system: a mouse click.
When you click your mouse, the operating system “fires” an event. All applications are then notified of that event, and if they are “listening” for it (determined by the application having registered a “listener” or “callback” for it), they will be given the opportunity to take action in response to it. In the meantime they will be given important details about the event (did they double click, where did they click, etc) to facilitate the creation of the desired response.
What an application does in response to an event is completely up to the developer.
Events in Movable Type
As Movable Type runs it is constantly firing events. Often these events get fired off into the ether because no plugin has registered a callback for it. When a callback has been registered, this is what happens:
Movable Type encounters a point in its operation where it needs to notify plugins than an event of interest to them occurred.
If multiple callbacks are listening for that event, they are sorted in priority order.
One-by-one, each callback is executed in priority order.
Movable Type blocks while each callback runs. In other words, Movable Type does not invoke the next callback, or continue normal operation until the callback being invoked is finished running.
Once all the callbacks are finished running, Movable Type resumes normal operations until it encounters another points in its operation where it needs to fire an event.
Event Categories
There are type primary different types of events in Movable Type:
- Application-level Events
- Object-level Events
Application-level Events
Application events occur at specific points during the life cycle of the Movable Type. Application callbacks include those that are fired during publishing, during backup and restore operations, in our Atom and XML-RPC APIs and more.
For a complete listing of Application Callbacks, consult the Movable Type Callbacks Reference.
Object-level Events
Object-level events are automatically associated with every single object type in Movable Type and are fired just prior to and after that object is modified in the database. For example, all objects expose the following standard subroutines:
- save
- load
- load_iter
- remove
- remove_all
Events are fired for each of the above operations just prior and immediately following them being called by a developer. Developers can register callbacks for the following events, which hopefully will correlate logically to their corresponding events:
- MT::ObjectName::pre_save
- MT::ObjectName::post_save
- MT::ObjectName::pre_load
- MT::ObjectName::post_load
- MT::ObjectName::pre_remove
- MT::ObjectName::pre_remove_all
- MT::ObjectName::post_remove_all
A couple of notes:
pre_loadandpost_loadcallbacks are invoked for each object when a developer invokes theload_itermethod on an objectno event is fired for
post_remove
You will need to replace “MT::ObjectName” with the package name for the object in question. For example, the pre_save event for the MT::Entry object is: MT::Entry::pre_save.
Note: Developers creating their own object types do not need to create or fire these events. That is handled for you by Movable Type’s data abstraction layer.
Registering Callbacks
To register a callback for an event in Movable Type, you will need to make changes to your config.yaml. You will need to have on hand two things:
- the name of the event you are listening for
- the package name and subroutine name to be invoked when the event occurs
For example, to register a callback for the MT::Entry pre_save event, use the following config.yaml:
name: Example Plugin for Movable Type
id: Example
description: This plugin is an example plugin for Movable Type.
version: 1.0
callbacks:
    MT::Entry::pre_save: $Example::Example::Plugin::entry_pre_save
You will then need to add an event handler or callback function to your Plugin.pm file.
Tip: Registering Any-Class Object-level Callbacks
Developers can also register callbacks for all pre_save events by using a wildcard like so:
name: Example Plugin for Movable Type
id: Example
description: This plugin is an example plugin for Movable Type.
version: 1.0
callbacks:
    '*::pre_save': $Example::Example::Plugin::entry_pre_save
“Any-class” callbacks are called after all class-specific callbacks.
Event Handlers
Once you have registered a callback in your config.yaml file you will need to implement the callback in your Plugin.pm file.
One very important thing to note is that the inputs into your callback handler will vary greatly depending upon the event being fired. Consult Appendix B: Movable Type Callbacks Reference for a complete list of events and their callback signatures.
Here is a code sample corresponding to the config.yaml above:
package Example::Plugin;
use strict;
sub pre_save_filter {
    my ($cb, $obj) = @_;
    # $cb - holds a reference to the callback object
    # $obj - holds a reference to the object about to be saved
    #        do your thing
}
Error Handling
Strictly speaking, the result returned by a callback is ignored by Movable Type, unless of course an error is returned. In which case the error returned is logged in Movable Type’s Activity Log to assist in debugging. Here is a code sample illustrating how to properly return an error:
sub my_callback {
    my ($cb, ...) = @_;
    if ( <error condition> ) {
        return $cb->error("Error message");
    }
}
Another way to handle errors is to call the perl function die. If a callback dies, MT will warn the error to the activity log, but will continue processing the MT::Object operation: so other callbacks will still run, and the database operation should still occur.
Creating Your Own Callbacks
In some circumstance a developer may wish to fire off an event of their own so that another part of their application can respond accordingly. To fire an event call run_callbacks on the primary MT instance. Pass to run_callbacks the name of the event people can register callbacks for, and any additional parameters that will be passed to the callback as arguments.
This is how you would fire an event:
package Example::Plugin;
use strict;

sub do_something {
    # the plugin is doing something
    my $result = MT->run_callbacks('CallbackName', $arg1, $arg2);
    # the plugin keeps doing something
}
And here is the registry entry for this callback:
callbacks:
    Example::Plugin::CallbackName: $Example::Example::Plugin::handler
And finally the event handler itself:
sub handler {
    my ($cb, $arg1, $arg2) = @_;
    # handle the event
}
Delving into Movable Type’s Perl API
So far the topics we have covered relate exclusively to features exposed by Movable Type’s registry. In each case developers make primarily two modifications to their plugin to add a new feature:
- they edit their
config.yamlto register new behavior - they add a handler to their plugin’s
Plugin.pmfile
By furthering your understanding of the primary interfaces and objects that Movable Type makes available to developers, you can build much more complex, robust and feature rich plugins and applications.
This section will introduce developers to those interfaces, specifically:
- how to manipulate objects like entries, pages and users
- how to define your own objects that your plugin can utilize
- how to extend existing objects with your own data
- how to trigger automated updates to the database without the need to write SQL
Objects, Data Structures and Persistence
Movable Type offers a robust system for managing application and user defined data. The primary interface to this system is through the base class MT::Object, which all other objects derive from.
Because all objects inherit from the MT::Object base class that means that all objects will automatically support the following features and behaviors:
the methods
new,load,save,removeandremove_allare defined automaticallyall objects will be cached in memcached when properly enabled
callbacks into the creation and editing of objects are defined
support for storage of that object across all supported databases, including mysql, postgres, SQL Server, Oracle and SQLite
upgrades and changes to the underlying database schema are completely automated
Movable Type Objects actually know nothing at all about how they are stored. They simply know about the data they represent. Movable Type’s data abstraction layer takes care of all of the SQL and database specific issues for you.
In Movable Type, developers never have to write SQL.
Movable Type’s Data Abstraction Layer: What is MT::Object, MT::ObjectDriver and Data::ObjectDriver?
For the geeks out there let us take a quick diversion to give ourselves a little background on Movable Type’s data abstraction layer. This layer is what allows developers to store and retrieve all manner of data to and from the database without ever needing to know or understand SQL. It is also what makes it possible for Movable Type to automate database upgrades and easily support multiple databases without developer’s having to grapple with the idiosyncratic differences between them.
There are a number of key classes that make up this framework, they are:
MT::Object - the base class from which all other objects derive. Each MT::Object defines the data model for that specific object.
MT::ObjectDriver - a thin wrapper around the core underlying data abstraction backend called Data::ObjectDriver. This is maintained for backwards compatibility.
Data::ObjectDriver - an open source data abstraction layer for Perl applications. This is where most of the work is done and is what is primarily responsible for converting API calls to SQL statements. It also provides support for memcached and other low level database features like partitioning (a feature planned for a future release).
Interacting with MT::Objects: loading, creating and saving
All Movable Type Objects support a standard set of calls that can be used to load, save and remove objects from the database. These methods are:
new()save()load($terms, $arguments)load_iter($terms, $arguments)remove($terms, $arguments)remove_allcount($terms)exists($terms)clone()
Let’s look at each in more detail.
new()
The new() method is used to instantiate a new object in the database. The object is not physically created until save() is called subsequently.
my $foo = MT::Foo->new;
$foo->property('bar');
$foo->save();
The new() method takes no arguments, and simply initializes a new in-memory object.
save()
To save an object call the save method:
$foo->save();
On success, save will return some true value; on failure, it will return “undef”, and you can retrieve the error message by calling the errstr method on the object:
$foo->save
    or die "Saving foo failed: ", $foo->errstr;
If you are saving objects in a loop, take a look at the “Note on object locking”.
load()
The load method can be used to load objects from the database. The load method can be used to compose queries that are both simple extraordinarily powerful. In fact the majority of queries that can be expressed in SQL can be represented by a call to the load() method.
As a result, the syntax for the load method is far too complex to discuss in complete detail here. For a complete description of load and its many facets, please consult Appendix B: MT::Object POD Documentation. What follows are just the basics of the load method.
The load method can be used to load a single object or multiple objects from the database. What is returned depends largely upon the context in which load is called. Take for example the following:
my $object = MT::Foo->load( $id );

my @objects = MT::Foo->load(\%terms, \%arguments);
You will notice that when load is called with a single scalar as input, load will attempt to look up the object in the database corresponding to that ID and return it. If load is called in an array context as in the second example, then load will return an array of objects.
Most commonly load takes two arguments as input:
a hash containing the query terms or constraints (e.g. load user whose favorite color is blue)
an hash containing the arguments for the query (e.g. limit the results of the query to 10, or sort the results by first name)
Valid arguments are:
sort - the column to sort by
direction - To be used together with a scalar sort value; specifies the sort order (ascending or descending). The default is “ascend”.
limit - Rather than loading all of the matching objects (the default), load only “N” objects.
offset - To be used together with limit; rather than returning the first “N” matches (the default), return matches “M” through “N + M”.
lastn
start_val - To be used together with limit and sort; rather than returning the first “N” matches, return the first “N” matches where “column” (the sort column) is greater than “value”.
range - specifies that the specific column should be searched for a range of values, rather than one specific value.
range_incl - Like the ‘range’ attribute, but defines an inclusive range.
join - can be used to select a set of objects based on criteria, or sorted by criteria, from another set of objects.
unique - Boolean flag that ensures that the objects being returned are unique.
Let’s look at a complete example:
my @objects = MT::Foo->load(
    {
        title => "Hello World",
        foo => "bar",
    }, {
        sort => 'created_on',
        direction => 'ascend',
    }
);
load_iter()
The load_iter method returns an “iterator” that can be invoked to move though a dataset one item at a time. This technique is especially useful when working is large datasets because it progressively loads data from the database as needed.
my $iter = MT::Foo->load_iter({ foo => 'bar' });
while (my $foo = $iter->()) {
    $foo->remove;
}
The load_iter method supports one argument that load does not: window_size.
The window_size parameter is useful because it limits how many objects are loaded from the database at a time and can greatly reduce memory consumption. For example, when calling load_iter in order to iterate over each object in the database, load_iter will by default load 100 records at a time. Doing so limits the number of queries to the database Movable Type must make to load one item after another. The window_size argument adjusts the number of objects to load at a time.
remove()
To remove an object from the datastore, call the remove method on an object that you have already loaded using load:
$foo->remove();
On success, remove will return some true value; on failure, it will return “undef”, and you can retrieve the error message by calling the errstr method on the object:
$foo->remove
    or die "Removing foo failed: ", $foo->errstr;
You can restrict what specific objects you remove or delete by passing to the remove() method a hash containing the constraints for the request. For example:
MT::Foo->remove({ bar => 'baz' });
The terms you specify to remove by should be indexed columns. This method will load the object and remove it, and then fire the callback operations associated with those operations.
remove_all()
To quickly remove all of the objects of a particular class, call the remove_all method on the class name in question:
MT::Foo->remove_all();
On success, remove_all will return some true value; on failure, it will return “undef”, and you can retrieve the error message by calling the errstr method on the class name:
MT::Foo->remove_all
    or die "Removing all foo objects failed: ", MT::Foo->errstr;
count()
To determine how many objects meeting a particular set of conditions exist, use the count method:
my $count = MT::Foo->count({ foo => 'bar' });
The count method takes the same arguments as load and load_iter.
exist() and exists()
To check and see if an object that you have instantiated already exists in the database, use the exists method:
if ($foo->exists) {
    print "Foo $foo already exists!";
}
To test to see if an object with specific properties exists in the database, use the exist method:
if (MT::Foo->exist( { foo => 'bar' })) {
    print "Already exists!";
}
Tip: Calling exist is faster than issuing a count call.
clone()
Returns a clone of $obj. That is, a distinct object which has all the same data stored within it. Changing values within one object does not modify the other.
An optional “except” parameter may be provided to exclude particular columns from the cloning operation. For example, the following would clone the elements of the blog except the name attribute.
$blog->clone({ except => { name => 1 } });
$obj->clone_all()
Similar to the “clone” method, but also makes a clones the metadata information.
Creating Your First Object
The first step in creating an object is to create a file that will contain all of the information Movable Type needs to know about the object, and that will also provide developers with any additional interfaces for interacting with that object. Let’s do that now.
Create a file called MyObject.pm in the following path:
/path/to/mt/plugins/MyPluginName/lib/MyPluginName/
Now, let’s add a really simple code stub that you can edit and customize for your own purposes. As always: don’t worry, we will deconstruct what all of this does in a moment.
Open MyObject.pm in a text editor and copy and paste the following into it:
package Example::MyObject;

use strict;
use base qw( MT::Object );

__PACKAGE__->install_properties({
    column_defs => {
        'id'            => 'integer not null auto_increment',
        'blog_id'       => 'integer',
        'some_property' => 'string(100) not null',
    },
    audit => 1,
    indexes => {
        id => 1,
    },
    datasource => 'myplugin_myobject',
    primary_key => 'id',
});
sub class_label {
    MT->translate("My Object");
}
sub class_label_plural {
    MT->translate("My Objects");
}

1;
A look inside install_properties
MT::Object’s install_properties method does most of the work when defining a new MT::Object. It takes as input a single argument, a hash containing one or more of the following keys:
column_defs- The data structure of your object. This is a collection of your object’s property names and their corresponding data types. See “Defining Your Schema” below.audit- This is a boolean flag. When set to true, Movable Type will automatically create all of the database columns to track whenever the object is modified and by whom.indexes- This is a hash containing a list of the indexes to add to the database for this object. See “Indexes.”datasource- The table name to store the object’s data in.meta- This is a boolean flag. When set to true, Movable Type will maintain a separate table to store additional meta data for the object as defined by plugins and third parties.class_type- If declared MT will define an additional column in the database called ‘class’ to differentiate between different types of objects that share the same physical table (like entries and pages, or the various types of assets that MT supports)class_column- If specified will use this as the column name for the ‘class_type’ field above.
Tip: See Appendix B: MT::Object POD Documentation for a more thorough explanation of install_properties.
Indexes
Database indexes are used to increase the speed and efficiency of database queries. Indexes are specified by identifying the columns by which queries are likely to be constrained. In Movable Type, this is how you specify two indexes, one on column_1 and the other on column_2.
The value for the indexes key should be a reference to a hash containing column names as keys, and the value 1 for each key - each key represents a column that should be indexed:
indexes => {
    'column_1' => 1,
    'column_2' => 1,
},
For multi-column indexes, you must declare the individual columns as the value for the index key:
indexes => {
    'column_catkey' => {
        columns => [ 'column_1', 'column_2' ],
    },
},
For declaring a unique constraint, add a ‘unique’ element to this hash:
indexes => {
    'column_catkey' => {
        columns => [ 'column_1', 'column_2' ],
        unique => 1,
    },
},
Defining Your Schema: column_defs
The definition of the columns (fields) in your object. Column names are also used for method names for your object, so your column name should not contain any strange characters. (It could also be used as part of the name of the column in a relational database table, so that is another reason to keep column names somewhat sane.)
The value for the columns key should be a reference to a hashref containing the key/value pairs that are names of your columns matched with their schema definition.
The type declaration of a column is pseudo-SQL. The data types loosely match SQL types, but are vendor-neutral, and each MT::ObjectDriver will map these to appropriate types for the database it services. The format of a column type is as follows:
'column_name' => 'type(size) options'
The ‘type’ part of the declaration can be any one of:
string - For storing string data, typically up to 255 characters, but assigned a length identified by ‘(size)’.
integer - For storing integers, maybe limited to 32 bits.
boolean - For storing boolean values (numeric values of 1 or 0).
smallint - For storing small integers, typically limited to 16 bits.
datetime - For storing a full date and time value.
timestamp - For storing a date and time that automatically updates upon save.
blob - For storing binary data.
text - For storing text data.
float - For storing floating point values.
Note: The physical data storage capacity of these types will vary depending on the driver’s implementation.
The ‘(size)’ element of the declaration is only valid for the ‘string’ type.
The ‘options’ element of the declaration is not required, but is used to specify additional attributes of the column. Such as:
not null - Specify this option when you wish to constrain the column so that it must contain a defined value. This is only enforced by the database itself, not by the MT::ObjectDriver.
auto_increment - Specify for integer columns (typically the primary key) to automatically assign a value.
primary key - Specify for identifying the column as the primary key (only valid for a single column).
indexed - Identifies that this column should also be individually indexed.
meta - Declares the column as a meta column, which means it is stored in a separate table that is used for storing metadata. See Metadata for more information.
Extending Existing Objects
Sometimes a developer wants to associate additional properties with an object without being forced to create a sub-class.
Movable Type allows any object’s schema to be extended. This allows plugins and components to insert and associate additional pieces of data, called “meta data,” with a pre-existing data type. Furthermore, these additional pieces of data become a seamless extension of the original data element, allowing that object to be sorted by and filtered by the new data element quickly and easily.
Extending an object is done by declaring the extension within the registry. For example, to add a new “is_featured” field to the core entry object for the purposes of allowing admins to designate if an entry is featured or not, one would use the following config.yaml:
name: Example Plugin for Movable Type
id: Example
description: This plugin is an example plugin for Movable Type.
version: 1.0
schema_version: 2
object_types:
    entry:
        is_featured: smallint
This works because whenever a plugin attaches properties to a pre-existing object type, then that object_type declaration acts as an extension to the pre-existing object type. In addition that additional piece of meta data is accessible directly from the associated object. For example:
use MT::Entry;
my $entry = MT::Entry->load($id);
$entry->is_featured(1);
$entry->save;
About Schema Versions
If a developer ever modifies or adds additional meta data fields to an object, then the developer should increment the schema_version attribute of their plugin should be incremented to signal to Movable Type that some database maintenance may be required. When this happens, next time Movable Type is accessed the upgrade process will be invoked and Movable Type will automatically make changes to your database schema as necessary.
Getting and Storing Data for a Custom Data Type
Once you have registered and defined your custom object type. You can easily save instances of the object, or retrieve and/or delete them from the database. Here are some very simple code samples which cover the basics of retrieving and storing these custom objects from the database:
Inserting Data
my $object = TestPlugin::SuperHappyVideo->new;
$object->blog_id(1);
$object->title("My latest video");
$object->length(120);
$object->description("The best video in the world.");
$object->save;
Loading and Updating Data
my $object = TestPlugin::SuperHappyVideo->load({ id => 4 });
$object->title("My latest HAPPY video!");
$object->save;
Deleting Data
my $object = TestPlugin::SuperHappyVideo->load({ id => 4 });
$object->remove;
There are a number of different functions Movable Type makes available to you to make it easier to query and manipulate data in the database. Some of these functions are:
loadload_iterget_by_keyremoveremove_allremove_childrensaveset_by_keyinitjoinuniquecountcount_group_byexists
For complete documentation on creating custom objects, please consult Appendix B.
Interfaces
MT::Taggable
Movable Type comes with an easy to use tagging framework that allows any developer to attach tags to any object in the system. Once an object is designated as “taggable” then they will immediate be able to use all of the interface methods of a taggable object to get and set tags on that object.
The following methods are supported on any taggable object:
tags(@tags)- gets or sets an object’s list of tags. If used as a set operation, this method will replace any existing tags with the ARRAY of provided tags.add_tags(@tags)- takes as input an ARRAY of tags to append to an objectremove_tags(@tags)- removes any tags found in the ARRAY of tags provided to the method as inpputhas_tag($tag)- returns true if the specified tag can be found in the associated objecttag_count()- returns the number of tags this object hastagged_count()- returns the number of objects that share the specified tag
Inheriting from the Taggable Interface
To make an object taggable, a developer need only state that their package inherits from the MT::Taggable interface like so:
package My::Object::Model;
use MT::Tag;
use base qw( MT::Object MT::Taggable );
__PACKAGE__->install_properties({ # ... }); 1;
Using the MT::Taggable Interface
Then you get the methods in the Taggable interface on your model objects:
sub tag_awesomely {
    my ($m_id) = @_;
    my $m = My::Object::Model->load($m_id);
    if (!$m->has_tags('awesome')) {
        $m->add_tags('awesome');
    }
    $m->save();  # tags are automatically saved by the
                 # MT::Taggable::post_save_tags callback
}
MT::Scorable
Movable Type comes with a scoring framework built in. What does that mean? It means that a developer can very easily bootstrap any object, class or package they define to expose methods to allow for plugins to score, both positively and negatively that object.
get_score($plugin_key, $user)- Return the score of the object, scored by the user specified. This is not for total score of an object. This is to get a score specified by a user to an object.set_score($plugin_key, $user, $score, $overwrite)- Set specified score to the object by the user. If $overwrite argument is false and the user has already scored the object before, error results.score_for($plugin_key)- Return the total score of the object.vote_for($plugin_key)- Return how many users scored to the object.score_high($plugin_key)- Return the highest score to the object.score_low($plugin_key)- Return the lowest score to the object.score_avg($plugin_key)- Return the average score of the object.rank_for($plugin_key, $max)- Return the rank of the object based on its score among other objects of the same type. The smaller the number is, the higher the object’s rank is.
Inheriting from the MT::Scorable Interface
To make an object scorable, a developer need only state that their package inherits from the MT::Scorable interface.
package My::Object::Model;
use base qw( MT::Object <strong>MT::Scorable</strong> );

__PACKAGE__->install_properties({
    # ...
});

1;
Using the MT::Scorable Interface
Then you get the methods in the MT::Scorable interface on your model objects:
sub score_myobject {
    my ($m_id) = @_;
    my $m = My::Object::Model->load($m_id);
    my $is_awesome = $m->score_avg('percent-rating') > 80 ? 1 : 0;
    if ($is_awesome) {
        # do something wicked
    }
}
MT::Auth
Movable Type makes available to developers a pluggable authentication framework. This framework allows developers to replace Movable Type’s native authentication layer with their own, making it possible to support authentication protocols like LDAP, Apache Basic Auth, OpenID and Shibboleth.
The MT::Auth Interface
The MT::Auth module defines an interface, that when fully implemented will allow virtually any system to authenticate into Movable Type. Before we discuss the API at any great length, it is important to understand that most authentication drivers you might want to implement need not implement this entire interface. In fact most can extend an already implemented interface like MT::Auth::MT and override just the those components they need to for their specific use case.
Let’s look at the MT::Auth interface in more depth.
MT::Auth->fetch_credentials(\%context)- A routine that gathers login credentials from the active request and returns key elements in a hashref. The hashref should contain any of the following applicable key fields:- app - The handle to the active application.
- username - The username of the active user.
- password - The user’s password.
- session_id - If a session-based authenication is taking place, store the session id with this key.
- permanent - A flag that identifies whether or not the credentials should be indefinitely cached.
MT::Auth->validate_credentials(\%context)- A routine that takes the context returned by the ‘fetch_credentials’ method and determines if they are valid or not. It is also responsible for assigning the active user (e.g.mt->app->{user}) if the credentials are correct.MT::Auth->invalidate_credentials(\%context)- A routine responsible for clearing the active logged-in user. Some authentication modules may take advantage of this time to clear cookies, redirect the user to another web site or synchronize other operations.MT::Auth->is_valid_password($author, $password, $crypted, \$error_ref)- A routine that determines whether the given password is valid for the author object supplied. If the password is already processed by the ‘crypt’ function, the third parameter here will be positive. The \$error_ref is a reference to a scalar variable for storing any error message to be returned to the application. The routine itself should return 1 for a valid password, 0 or undef for an invalid one.MT::Auth->login_form- A method that returns a snippet of HTML code for displaying the necessary fields for logging into the MT application.MT::Auth->sanity_check- A method used by the MT application to determine if the form data provided for creating a new user is valid or not.MT::Auth->new_user- A method used in the login attempt to give a chance to each authentication layer to process the user who is going to be created upon logging in for the first time. The method must return boolean value indicating whether or not the method actually saved the new user to the database or not.MT::Auth->new_login- A method used in the login attempt to give chance to each authentication layer to process the existing user logging in.MT::Auth->delegate_auth- A boolean flag that identifies whether this authentication module provides a delegate authentication system. This would be the case where MT itself does not ask for authentication information, but instead defers to another web service or protocol. Typically, a delegated authentication also involves using request redirects to the authentication service when necessary.MT::Auth->password_exists- A boolean flag that identifies whether this authentication module utilizes a password or not (that is, whether one is required for an account and stored with the user profile).MT::Auth->can_logout- A boolean flag that identifies whether this authentication module allows for a ‘Logout’ link and logout mechanism within the application interface.MT::Auth->is_profile_needed- A boolean flag that identifies whether this authentication module expects the local management of the user’s profile.MT::Auth->can_recover_password- A boolean flag that identifies whether this authentication module provides a password recovery function. This is only valid when passwords are locally stored and managed.
Admittedly, that is a lot to bite off and chew. Let’s use a working example as a means to deconstruct how this interface works.
Example Driver: Apache Basic Authentication
Below is a driver that comes bundled with Movable Type. You can find it in the following location:
/path/to/mt/lib/MT/Auth/BasicAuth.pm
Let’s step through this authentication driver and shed some light on how the system works.
1  package MT::Auth::BasicAuth;
2
3  use strict;
4  use base 'MT::Auth::MT';
5  use MT::Author qw(AUTHOR);
6
7  sub can_recover_password { 0 }
8  sub is_profile_needed { 1 }
9  sub password_exists { 0 }
10 sub delegate_auth { 1 }
11 sub can_logout { 0 }
Line 1 defines the name of this driver as well as declaring the package name. An authentication driver must utilize a package name that belongs to the MT::Auth namespace.
Line 4 establishes this package as an extension of MT::Auth::MT. In this example, Movable Type’s native authentication handler does most of what we need it to. This driver needs to override where it will find the current user’s username and to validate the current user’s session.
Lines 7-11 define the basic behavior of this driver by toggling the various boolean flags associated with the driver.
12 sub new_user {
13     my $auth = shift;
14     my ($app, $user) = @_;
15     $user->password('(none)');
16     0;
17 }
Movable Type must make a record in its own database for each user that is to use the system. This is necessary in order to ensure a consistent means of identity for a user and to maintain the relational integrity between the user and all of the other tables in the database that must reference an author by ID or some other means.
The Apache Auth driver does not need to make any modifications to the user Movable Type will create automatically. All it does is set the user’s password to “(none)” to indicate that Movable Type is not the source of record for this user’s identity and password.
18 sub remote_user {
19     my $auth = shift;
20     my ($ctx) = @_;
21     if ($ENV{MOD_PERL}) {
22         my $app = $ctx->{app} or return;
23         return $app->{apache}->connection->user;
24     }
25     return $ENV{REMOTE_USER}
26 }
The method above is actually a utility function - it extracts from the web server’s context the current authenticated user’s username. Apache stores this information in the HTTP Header called REMOTE_USER. mod_perl on the other hand makes this information available through its API.
27 sub fetch_credentials {
28     my $auth = shift;
29     my ($ctx) = @_;
30     my $remote_user = $auth->remote_user($ctx);
31     my $fallback = { %$ctx, username => $remote_user };
32     $ctx = $auth->SUPER::session_credentials(@_);
33     if (!defined $ctx) {
34         if ($remote_user) {
35             $ctx = $fallback;
36         } else {
37             return undef;
38         }
39     }
40     if ($ctx->{username} ne $remote_user) {
41         $ctx = $fallback;
42     }
43     $ctx;
44 }
On line 30 we fetch from the web layer the name of the currently authenticated user. Then on line 31 we setup the default return value if we need to signal to Movable Type that we need to create a new Movable Type session for the current user.
On line 32 we take the first step and see if a Movable Type session exists. What we need to do next is check to see if that user has a current and active Movable Type session. If they do not have a context (line 33) but they have authenticated with Apache (line 34) then we return $fallback and create a new Movable Type session. If there is no active MT or Apache session, then we return undef to signal that the user is not logged in.
Finally, if the user is logged in to Apache and Movable Type we make sure their MT username is the same as the Apache username they authenticated with. If not, then signal to MT to create a new session.
45 sub validate_credentials {
46     my $auth = shift;
47     my ($ctx, %opt) = @_;
48     my $app = $ctx->{app};
49     my $user = $ctx->{username};
50     return undef unless (defined $user) && ($user ne '');
51
52     my $result = MT::Auth::UNKNOWN();
53
54     # load author from db
55     my $author = MT::Author->load({
           name => $user,
           type => AUTHOR,
           auth_type => $app->config->AuthenticationModule });
56    if ($author) {
57         # author status validation
58         if ($author->is_active) {
59             $result = MT::Auth::SUCCESS();
60             $app->user($author);
61
62             $result = MT::Auth::NEW_LOGIN()
63                 unless $app->session_user($author, $ctx->{session_id}, %opt);
64         } else {
65             $result = MT::Auth::INACTIVE();
66         }
67     } else {
68         if ($app->config->ExternalUserManagement) {
69             $result = MT::Auth::NEW_USER();
70         }
71     }
72     return $result;
73 }
74 1;
The validate_credentials method is called each time a user access the Movable Type application. It is responsible for determining whether the current state of their account and session - and what Movable Type should do in response. It returns one of the following return values:
MT::Auth::SUCCESS()- indicates that the user logging in has an active and valid account.MT::Auth::NEW_LOGIN()- indicates that the user logging in has an active account, but that Movable Type does not have an active session on record for them.MT::Auth::INACTIVE()- indicates that the user exists, but their account is disabled and they should not be permitted access to the application.MT::Auth::NEW_USER()- indicates that Movable Type has no record of the current user and that Movable Type should create the necessary record in its local database for the current user.
Enabling Your Driver
To enable a driver you have created, place the driver in your plugin’s lib directory, and then add the AuthenticationModule configuration directive to your mt-config.cgi file.
AuthenticationModule BasicAuth
The name of your authentication module corresponds to the name of your auth driver as it appears in its package name (e.g. MT::Auth::BasicAuth)
Tips and Tricks for Developers
Working with the Registry
The most common way of adding things to Movable Type’s registry is via a plugin’s config.yaml whose content ultimately gets merged into the global registry during Movable Type’s initialization phase. However, there are other ways of making modifications and additions to the registry using Movable Type’s API. This section will discuss a number of techniques you can employ to access and make maximal use of the registry.
Registry Code Handlers
In some circumstances, the contents you wish to add to the registry is based upon criteria that may change over time, and thus, a static set of registry keys is insufficient. Movable Type makes it possible to add items to the registry on the fly using a simple technique. The technique requires that for any key in the registry that you wish to be dynamic in nature, you use a code handler in place of a value you might normally associate with the key.
An example might best explain this scenario. Let’s look at two different ways to define the same set of menu items via a plugin:
applications:
  cms:
    menus:
        manage:myobject:
            label: My Objects
            mode: list_myobject
            order: 100
Now let’s produce the same results, but doing so programmatically. First, use a code handler as a value for your menus key:
applications:
  cms:
    menus: $DemoPlugin::DemoPlugin::Plugin::load_menus
Then implement your menu loader like so:
package DemoPlugin;
use strict;
sub load_menus {
    return {
      'manage:myobject' => {
          label => 'My Objects',
          mode => 'list_myobject',
          order => 100,
      }
    };
}
You should notice that the data structure defined by the config.yaml version is identical to that returned by the menu loader handler. The only requirement is that your handler must return a hash. If it returns anything else, it will be likely that Movable Type will begin producing critical errors.
Removing keys from the Registry
In working directly with the registry, it is possible for your plugin not only to programatically add items to the registry, but also to remove them as well. To remove an item from the registry, you first obtain a handle to the registry and then delete any nodes from that handle that you want to remove. Let’s look at an example in which you want to remove the “Manage” menu from Movable Type.
sub load_menus {
    my $mt = MT->component('Core');
    delete $mt->{registry}->{applications}->{cms}->{menus}->{manage};
    return {};
}
The example above takes a hatchet to the registry, but you may also use a scalpel. In the following example, we will remove a single menu item, the “Styles” menu supplied by Style Catcher.
sub load_menus {
    my $sc = MT->component('StyleCatcher');
    delete $sc->{registry}->{applications}->{cms}->{menus}->{design:styles};
    return {};
}
Debugging Movable Type
Developing an application of any size requires tools to assist developers to help hunt down the bane of their existence: bugs. The smallest of these pesky little things can wreak havoc upon a system, and without the right skills and tools it can be near impossible to root them out. The following section discusses the many such tools in Movable Type to help developers in this unfortunate and inevitable task.
The Activity Log
The Movable Type Activity Log is perhaps one of the most under rating and under utilized features of Movable Type. Virtually every action of interest inside the application is recorded there providing a pretty reliable audit trail for the application, you content and you users.
The Activity Log can also provide a useful source of debugging information. The following section will provide you with the information you need to leverage this resource to help debug and develop your plugin.
Tip: Using the activity log to detect plugin load failure
Commonly a developer will introduce a syntax error into a plugin they are developing without knowing it. When they go to test their plugin their realize that MT is behaving as if their plugin wasn’t even installed.
When Movable Type fails to load a plugin, due to an invalidly formated config.yaml, or to a Perl error in their Plugin.pm file, Movable Type will ignore the plugin and continue operating normally. It will also record in the Activity Log the failure and the reason for the failure.
This often provides developers with the exact information they need to fix their plugin and continue on in their development.
Logging to the Activity Log
To create an entry in the Activity Log, use the following code sample:
MT->log({
  message => "Something happened.",
  class => 'system',
  level => MT::Log::DEBUG(),
});
MT->log Properties
- message - The message to enter into the log.
- class - The type of log entry. In most cases, the default “system” value is sufficient. The others are used to additional log information about content created in the system.
- system (default)
- comment
- page
- ping
- level - The log level of nature of the log entry. This is used to differentiate between informational messages and errors.
- MT::Log::INFO()
- MT::Log::WARNING()
- MT::Log::DEBUG()
- MT::Log::SECURITY()
- MT::Log::ERROR()
DebugMode
Movable Type has a built in developer mode that modifies the behavior of the application slightly to make it easier for developers to build, test and debug plugins they are building on top of Movable Type. This mode is activated when the DebugMode configuration directive has been added to the installation’s mt-config.cgi file.
When in “DebugMode” Movable Type can:
- Monitor the API plugins use and report any issues, discrepancies or ways in which the plugin may not be fully compatible with MT4.
- Use the non-compressed javascript files allowing javascript debuggers to more easily report specific line numbers and files in which problems may be occurring
- Use non-compressed CSS files allowing debuggers to report more precisely about what stylesheet problems may exist
- The
devel.jsjavascript file will be included on each page of the application. This javascript file outputs log information to the browser console so that plugins like Firefox’s FireBug can capture and report to developers debugging information about javascript code running on the page. IE and Safari users will have this information displayed to them through javascript pop-ups. - And warnings emanating from plugin code or perl code will be displayed at the bottom of the page. This provides a nice linting framework for reporting possible issues with the plugin.
Prerequisites
- Users should install the Time::HiRes perl module prior to enabling DebugMode
Turning On Debug Mode
To turn on Debug Mode within Movable Type, edit your mt-config.cgi file and add the following line:
DebugMode 1
The DebugMode is a bit-wise setting and offers the following options:
- 1 - Display debug messages
- 2 - Display a stack trace for messages captured
- 4 - Lists queries issued by Data::ObjectDriver
- 8 - Reports on MT templates that take more than 1/4 second to build*
- 128 - Outputs app-level request/response information to STDERR.
These can be combined, so if you want to display queries and debug messages, use a DebugMode of 5 for instance.
Debugging Template Tags
By setting the DebugMode to a value of 8, you can get some performance information about your template tags. These messages get sent to your web servers error log or STDERR. He is some sample output:
Builder: Tag [Assets] - 12.007559 seconds
Builder: Tag [Tags] - 0.877185 seconds
Builder: Tag [If] - 0.877515 seconds
Builder: Tag [Include] - 1.063821 seconds
Builder: Tag [Else] - 1.064076 seconds
Builder: Tag [If] - 1.064391 seconds
Plugin Compatibility
When Debug Mode is enabled, Movable Type will report for each enabled plugin the use of any deprecated API. This is a very simple way for example to ensure that your plugins do not make calls to methods or subroutines that might in the future be removed. The screenshot below shows what type of information is displayed when DebugMode is set to “1”.
Performance Optimization
Movable Type has a built in framework for monitoring every aspect of a request’s lifecycle. Throughout this process, Movable Type will log detailed information to a file expounding upon the actions performed, template tags processed, and so forth.
This information can be used to easily identify those aspects of your application that are taking a long time to process or run. You can then in turn use this information to optimize your plugin and eliminate bottlenecks and inefficient code.
Related Configuration Directives
Performance logging is turned on by adding a set of configuration directives to your mt-config.cgi file. The supported directives are:
PerformanceLogging(boolean) - Turns performance logging on and offPerformanceLoggingThreshold(float) - Sets the threshold at which events will be logged. The value is expressed in seconds and fractions of a second. Any task that takes less then the threshold will not be logged.PerformanceLoggingPath(string) - Allows you to specify where you would like your log files to place on your local filesystem.ProcessMemoryCommand(string) - Allows you to specify a command that can be run that will show the memory utilization of a process. For example, in Mac OS X the following command can be used (the$$will be automatically substituted with the relevant process ID or “pid”): ProcessMemoryCommand ps $$ - o rss=
Example Configuration
PerformanceLogging 1
PerformanceLoggingPath /var/log/mt/
PerformanceLoggingThreshold 0.5
Process Memory Commands
The ProcessMemoryCommand default setting should work fine on Mac OS, Linux and Windows environments. If you are seeing errors, you may need to customize it for your environment. The default command for each environment is as follows. The command is expected to return the process memory “RSS” size, expressed in kilobytes. If this is set to “0”, this command will not be issued and output in the logs.
Linux
ProcessMemoryCommand ps - p $$ - o rss=
Mac OS X
ProcessMemoryCommand ps $$ - o rss=
Windows
ProcessMemoryCommand tasklist /FI 'PID eq $$' /FO TABLE /NH
Log Format
When performance logging is enabled, Movable Type will attempt to log as much information as it can during the life-cycle of a request. Doing so will provide valuable information regarding specific areas of the application that could benefit from performance tuning, and will allow users to more easily analyze what within their system may be contributing to poor performance.
Movable Type will attempt to log:
- Information about your operating system, installed software, etc. (this information is logged only once)
- How much memory is being utilized by the process at the beginning and at the end of the request.
- How long it takes to process each template tag, both within the application and on the published blog.
- The URL of the request
- The process ID of the request for easier correlation and log analysis.
Log Rotation
Performance log files will be rotated automatically each day to ensure that files do not get needlessly large and to make it easier on admins to archive older log files.
Sample Output
# Operating System: darwin/9.1.0
# Platform: darwin
# Perl Version: v5.10.0
# Web Server: Apache/2.2.6 (Unix) mod_ssl/2.2.6 OpenSSL/0.9.7l DAV/2
    PHP/5.2.4 mod_fastcgi/2.4.2
# Database: MySQL/5.0.45
# Database Library: DBI/1.601; DBD/4.005
# App Mode: CGI
[Wed Mar 5 10:12:54 2008] localhost pt-times: pid=14596, uri=[/cgi-bin/mt/mt.cgi?__mode=view&_type=entry&id=2733&blog_id=4], mem_start=24327, mem_end=26428, MT::Template::build[include/header.tmpl]=0.04259, MT::Template::build[include/actions_bar.tmpl]=0.01165, MT::Template::build[include/actions_bar.tmpl]=0.01149, MT::Template::build[include/footer.tmpl]=0.01177, MT::Template::build[edit_entry.tmpl]=0.21346, MT::App::CMS::run=0.48057, Total=0.79270
[Wed Mar 5 10:13:12 2008] mtbook.local pt-times: pid=14601, uri=[/cgi-bin/mt/mt.cgi?__mode=view&_type=entry&id=2734&blog_id=4], mem_start=24468, mem_end=26412, MT::Template::build[include/header.tmpl]=0.04200, MT::Template::build[include/actions_bar.tmpl]=0.01175, MT::Template::build[include/actions_bar.tmpl]=0.01143, MT::Template::build[include/footer.tmpl]=0.01069, MT::Template::build[edit_entry.tmpl]=0.15787, MT::App::CMS::run=0.46547, Total=0.72004