An Introduction to the Smartphone Admin Screen
From version 5.2.6, "Smartphone Option" have been bundled as a default plugin. Smartphone Option is available bundled together with either Movable Type Professional or Movable Type Advanced, only be obtained through a bundle purchase.
The Admin Screen Overview
One of the first differences between the PC and smartphone versions the user might notice is the exclusion of the "system screen". As the mechanics for changing Movable Type settings, such as blog system settings, are unavailable from a smartphone, the system screen was deemed unnecessary for the smartphone environment.
The smartphone admin screen can be broken down into three main sections.
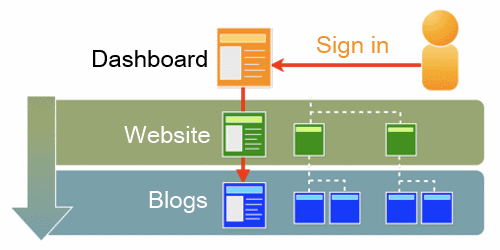
User Dashboard
The initial screen upon signing in to Movable Type. The dashboard displays basic information about the signed in user, as well as any websites or blogs the user has authorized access to.
Website
Previously created websites can be selected and managed from this section. It is also possible to create blog entries for blogs connected to the websites listed.
Blog
Blogs connected to authorized websites can be managed from this section. It is also possible to create new blog entries and pages.
Navigating the User Dashboard
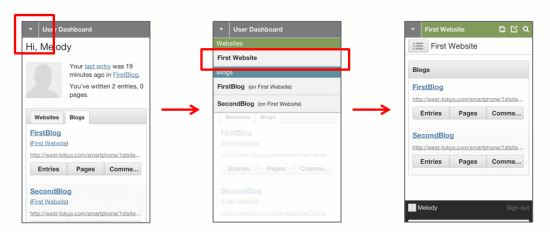
After signing in via the admin screen, the next screen the user will see is the user dashboard. From this main portal, the user can easily switch between viewing the main dashboard or managing authorized websites or blogs.
To move between the user dashboard, website and blog admin screens, simply tap the downwards facing triangle icon in the upper left hand corner of the screen to reveal the navigation pulldown option. Then tap on the name of the website or blog to move to that website or blog's associated dashboard. If you notice that a specific website or blog is missing from the pulldown list, tap on the "Choose a blog (website)" menu option. All available websites and blogs for the user should appear as a list.
Side Menu
The side menu is used to select actions to perform on the currently selected website or blog. Options that are above the authority level of the user will not be displayed. Tap the menu icon in the top left hand corner to display the available menu options. Tap the downwards facing triangle icon to the left of each menu item to display hidden sub menus, including "Manage", "New", and "Categories". Tapping the main option tab will automatically select the first sub-menu option.
The Difference between"Blog" and "Website"
There is one main difference between the "website" and "blog" side menu options. A summary of all associated blogs, blog entries, pages and folders can be viewed and managed from the "website" dashboard. Blog category summaries, however, are only available from the "blog" dashboard.
Shortcuts
There are three common action shortcut icons located in the upper right hand of the screen. These three shortcuts are as follows:
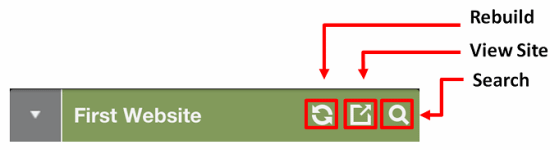
Rebuild
- Rebuilds the currently selected blog or website.
View Site
- Displays a preview of the selected blog or website in a new window.
Search
- Provides a basic search function for information contained in the currently selected blog or website.
The footer contains information on the currently signed in user (user name and user icon), as well as two additional short cut icons. An overview of the footer contents is listed below.
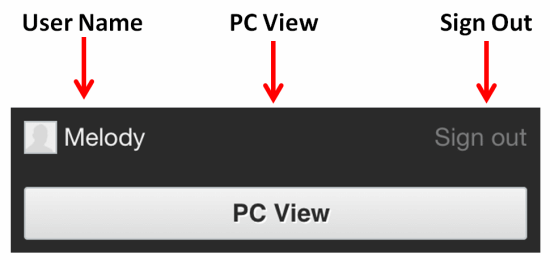
Sign Out
- Signs out the currently signed in user.
User Name
- Displays the user name and user icon for the currently signed in user.
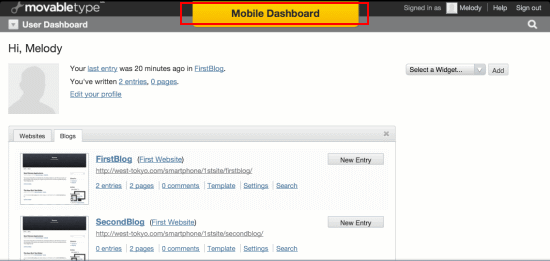
PC View
- Tap to switch to the "MT admin screen for PC" view. To return to the smartphone admin screen view, tap the "Mobile Dashboard" link.