Linux/Unix Detailed Instructions
The Quick Start instructions provide the basic steps for installing on a Web server where the required components have already been installed. The instructions in this section describe how to install required components, how to customize the installation, and how to install extra features.
Step 1. Creating the Movable Type Database
You must create a database for Movable Type before you run the installation wizard. The wizard connects to the database with the user name and password you supply and configures it for use with Movable Type.
Methods for creating a database differ, depending on what database server software you are using on your Web server. Also, hosting providers offer different programs for administering databases. This section covers the most commonly used database servers and administration tools.
If you do not have a database server installed, contact your hosting provider or system administrator to install one for you. If you are the system administrator and need to install a database, MySQL is one of the most common and widely supported. For installation instructions, see the MySQL Installation Guide at http://mysql.com.
Creating a MySQL Database
Many hosting providers offer graphical user interface programs for managing MySQL databases. This section describes how to create a database from a shell and from two of the most popular programs: phpMyAdmin and cPanel.
Using a Shell
If you have shell access to your Web server, you can use the mysqladmin utility to create a database. Enter the following command to create a database named movabletype. mysqladmin create movabletype -u username -p
Replace “username” with the user name you want use to access the database. Enter the password for the user name you created. If the database is created successfully, you see no information on the screen.
Using phpMyAdmin
- In your Web browser, connect to the phyMyAdmin home pages for your Web server. You’ll need to get the exact Web address from your hosting provider. It should be something similar to
http://domainname/phpmyadmin/index.phpwhere “domainname” is the domain name for your blog.
You see the phpMyAdmin home page.

Enter
movabletypein the Create new database field, and click Create.Click the Home icon to return to the main page. Click Privileges and Add New User. Enter a user name and password in the corresponding fields. Leave all other options set to their default values. Click Go.
On the Privileges screen click Check Privileges on the user you just created. In the Database-specific privileges, display the Add Privileges to the Following Database drop-down menu and select the movabletype database. Select all privileges and click Go.
Using cPanel
In a Web browser, connect to CPanel, by entering it’s address, typically
http://domainname.com/cpanelwhere “domainname” is the domain name for your blog.Scroll down to the Databases area and click the icon to work with MySQL databases.
You see a control panel for managing MySQL databases.
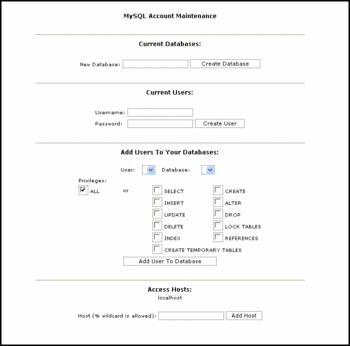
In the New Database field, movabletype as the name of the Movable Type database, and click Create Database.
In the Current Users area, enter a user name and password to use to connect to the movabletype database. Then click Create User.
In the Add Users to Your Database area, select the user and database that you created for Movable Type in the corresponding drop down boxes. Check “All” for Privileges. Then click Add User To Your Database.
Creating a PostgreSQL Database
Note: PostgreSQL is not supported in MT5.
Create a user and password for the movable type database by entering the following command in a shell:
createuser - U username -Pwhere “username” is the user name you want to use to connect to the Movable Type database. The -P option instructs the database server to ask you for a password. Enter the password for the new user.Enter the following command to create a new database named movabletype, where “username” is the user you created in step 1.
createdb -U username movabletype
When the Movable Type installation wizard asks what database you want to use, select PostgreSQL. On the PostgreSQL configuration page, enter the database name, user name, and password that you created.
Creating a SQLite Database
Note: SQLite is not supported in MT5.
SQLite does not require a user and password for the database. At a shell or DOS prompt, enter: sqlite3 movabletype to create a new database named movabletype. Note: In some cases, the binary will be named sqlite or, if you’re running the older SQLite2, sqlite2. Adjust accordingly.
Step 2. Select and Configure an Installation Directory
Depending on if you have privileges to edit your Web service configuration files, you have a choice of where to install the Movable Type files.
Using an Existing cgi-bin Directory
The quickest method, as recommended by the Quick Start instructions, is to create a directory name “mt” within your existing “cgi-bin” directory within your Web root directory. This might look like /var/www/movabletype.org/cgi-bin/mt.
The files within the “mt-static” directory within your Movable Type download must be web accessible. To accomplish this, you should install them into your Web root which might look like /var/www/movabletype.org/htdocs/mt-static.
Later in the installation process Movable Type will attempt to locate your mt-static directory automatically. If it is unable to, you may need to add the following configuration directives to your mt-config.cgi file (created for you later in the process):
CGIPath        /cgi-bin/mt/
StaticWebPath  /mt-static/
Installing Fully Within You Web Root
If you have privileges to edit your Web server configuration files, you can install all of the Movable Type files in an “mt” directory within your Web server’s Web root directory. With Apache configured this way, there is no need to setup or move your “mt-static” directory. Future upgrades are also much easier to manage as you’re only placing files in one location.
If you’re just running one blog on Movable Type, your directory layout may look like /var/www/movabletype.org/htdocs/mt. In the next step when you extract the Movable Type archive to this “mt” directory, it will contain all of the needed files including the “mt-static” directory.
You must then add the following text to either your .htaccess file or Apache’s httpd.conf file. Continuing the previous example, /path-to-movabletype would be /var/www/movabletype.org/htdocs/mt. In some cases you may also need to add the “FollowSymLinks” option depending on your web server configuration.
 <Directory /path-to-movabletype>
       Options +Indexes +ExecCGI
 </Directory>
Step 3. Download the Movable Type Files
Download the Unix/Linux/Mac OS X (.tar.gz) release file to your personal computer.
Extract the Movable Type files from the release file into a new folder on your local computer.
Use FTP to copy the files to your Movable Type installation directory. If you are installing in the cgi-bin directory, copy the mt-static directory from your local computer to the Web root directory on the Web server.
Step 4. Configure permissions
Make sure all the Movable Type cgi files (files ending with .cgi) in the mt directory on the Web server have execute permission.
Make sure the
supportdirectory found inside yourmt-staticdirectory is writable by the web server.
Please see the FAQ to configure your file permissions.
Step 5. Installing Perl modules
Movable Type requires several perl modules to run with. See the following instruction to install them via CPAN.
Installing Perl Modules - www.cpan.org
Step 6. Running the Installation Wizard
The installation wizard checks the configuration of your server, including database types and expansion packs, and displays a series of forms that you fill out to complete the Movable Type installation.
If the installation wizard displays a page listing optional Perl modules and features that you can install, print this page and save it so you know which modules to install later. The listing page tells where to get information on downloading and installing these modules.
To run the installation wizard, start a Web browser connect to the following Web address http://domainname/cgi-bin/mt/mt.cgi where “domainname” is the domain name for your blog.
When it completes, the installaton wizard writes the Movable Type configuration file, mt-config.cgi, and starts Movable Type. You are ready to begin adding content to the first blog and creating additional blogs. For instructions, see Working with Your Blog.
Bud on August 8, 2007, 7:08 a.m. 返信
Byrne, I’m going to jot up some detailed instructions for one corner case, Red Hat Enterprise Linux 5 and put a link to it here. It is somewhat of a twist on the “standard” linux install in that you have an extra layer of security to deal with and must be installing as a systems administrator so that you can configure that security.
Bud on August 10, 2007, 8:13 p.m. 返信
Redhat Enterprise Linux 5 differs from the standard unix install because it includes SELinux which adds a security layer over the normal unix access control lists. It can be difficult to figure out how to install MT4 in this environment. I’ve written a note with detailed instructions to help.
Gilzow on March 13, 2008, 12:12 p.m. 返信
If you are installing MT with SQLite, make sure that the directory where you store the database file, and the database file itself have adequate permissions for the user that the perl is executing under to write to. Failure to do so will result in a no database driver specified and DBI_DSN env var not set error message when you test the database connection.
Syca on May 21, 2008, 8:29 a.m. 返信
A helpful shortcut for step 3.4 if you have shell access would be to navigate to your install directory (where you have all the MT .cgi files) and type: chmod 755 *.cgi
pkhunte on March 18, 2009, 11:53 p.m. 返信
And how do you install one MT installation and run multiple domains from it?
Lurker on April 7, 2009, 3:00 p.m. 返信
You may also need to add this to an apache configuration file:
Also, if you need/want to use a mail server on another host, Mail::Sendmail may not work if the smtp host requires authentication. Then Net::SMTP with Authen::SASL, and related dependencies, may be required.
RNSA on April 25, 2009, 1:44 a.m. 返信
umm why is this system refusing to accept this image majik its installed and the system is to stupid to know it is the data center installed it twice and still wants to say its not installed when it is. i had to go and remove all cgi files to re new fresh reinstall and again same outcome a retard system. im sorry im not fixing it like i had to with wordpress that’s why they are being replaced now with this the. dev version is the only one working right beside the issue of image majik.
RNSA on April 25, 2009, 2:12 a.m. 返信
close that comment i fixed it the other one mt-4 is not making the front page after install.
Quinn Gittings on June 3, 2009, 8:18 p.m. 返信
I finally get to the “Initializing database… Starting installation…” screen, however it stops and nothing else happens.
I see several “(8)Exec format error: exec of ‘/var/www/html/mt/mt-static/mt.js’ failed, referer: http://*/mt/mt-upgrade.cgi” across many js files, which I believe is because its trying to “execute” these js files as if they are cgi files.
Any help guys?
Quinn Gittings on June 3, 2009, 8:28 p.m. 返信
FYI, I used the “Installing Fully Within You Web Root” instructions
bennetthaselton on September 14, 2009, 3:04 p.m. 返信
The instructions for installing the MySQL database from the command line, say:
Replace “username” with the user name you want use to access the database. Enter the password for the user name you created. If the database is created successfully, you see no information on the screen.
This looks to me like it’s wrong. You don’t replace “username” with the username used to access the Movable Type database. That will just give you an error since you’re trying to sign in using a username that doesn’t exist yet. You replace “username” with the MySQL administrator username. Then once signed in to MySQL as the MySQL administrator, you need extra steps to create a DIFFERENT username which is then used to access the Movable Type database.
(If you look at the instructions for creating the database using other routes, like phpMyAdmin, this is what they tell you to do.)
I think the instructions for creating the Movable Type database from the shell, should say something like the following:
=================
$ mysql -u adminusername -p Enter password: Welcome to the MySQL monitor. Commands end with ; or \g. Your MySQL connection id is 5340 to server version: 3.23.54
Type ‘help;’ or ‘\h’ for help. Type ‘\c’ to clear the buffer.
mysql> CREATE DATABASE movabletype; Query OK, 1 row affected (0.00 sec)
mysql> GRANT ALL PRIVILEGES ON movabletype.* TO “movabletypeusername”@”localhost” IDENTIFIED BY “password”; Query OK, 0 rows affected (0.00 sec)
mysql> FLUSH PRIVILEGES; Query OK, 0 rows affected (0.01 sec)
mysql> EXIT Bye $
where, in the above commands:
“adminusername” should be replaced with the MySQL administrator username. This would have been created back when you installed MySQL. Often it will just be called “root”.
“movabletypeusername” should be replaced with the username that you want to create to access the Movable Type database. This is not a pre-existing username; typing the above commands will create the new username. For good security, this should be different from the adminusername that is used to administer MySQL.
“password” should be replaced with the password that you want to use with the newly-created “movabletypeusername” MySQL account. Again, it is good security practice to make this different from the password for the MySQL administrator account (and also, different from the password that you used to connect to the machine in the first place).
Write down the values that you used for “movabletypeusername” and “password” since you will need to re-enter them later on in the Movable Type installation process.
=====================
I have verified that these instructions worked for me when I used them during the Movable Type installation process. Hope this is helpful.
jsharrow on September 19, 2009, 6:27 a.m. 返信
why? Got an error: Bad CGIPath config
Korsun Ivan on September 20, 2009, 10:17 a.m. 返信
Very actual question: “How do you install one MT installation and run multiple domains from it?”
Beau Smith on September 22, 2009, 10:44 p.m. 返信
@Korsun - I have configured MT to publish to different domains. This basically involves setting up the publishing paths to map to the web root for your other domains. Using aliases, you can point to the same mt-static and cgi directories. This all depends upon how your web host has the server set up and what you are able to do.
bartdivanov on November 13, 2009, 1:57 p.m. 返信
Are there any instruction for MT installation on Mac OS Leopard?